
Beading Market
Shop for beadwork made by your fellow beaders at the 3D-Beading.com Beading Market!


Welcome to the 3-D beaded rounded heart pattern instructions! If you have any difficulty following this tutorial, please post a comment at the bottom of the page on which you are stuck, and I'll do my best to help!

Before you begin ...
Materials: 1.5 meters of fishing line, 76 of size 15 (small) seed beads, 37 of size 6 (large) E-seed beads
Time required: 2 to 3 hours, up to 5 hours if inexperienced
Techniques: Beadweaving, right angle weave
Difficulty: Challenging (should be able to do Hello Kitty)
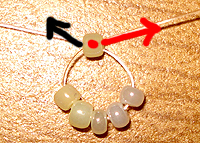
Step 1 : String 6 pearly small seed beads in sequence onto the fishing line. Then, as the picture on the left shows, "cross" the last bead you added (or the first) with the fishing line. The red dot depicts the bead that is to be crossed by the two ends of the fishing line, and the red and black arrows depict the two ends of the fishing line. I have been very consistent throughout the entire tutorial with the arrow directions, and that is to help you figure out what to do with which end, because it matters unless the pattern is symmetrical!

Step 2 : Now pull the two ends of the fishing line tightly through that small seed bead labelled with the red dot, and the picture in step 2 shows how it should look: a tight loop of 6 small seed beads. Now keep in mind as always that at this point, you should be making sure that the two ends of your fishing line are the same length. You can only bead with that fishing line piece until you reach the end of the shorter side. So, you should always make the two ends of fishing line equal in length after crossing the first bead in the pattern, and you do this by making sure your crossed bead is in the center of your 1.5-meter piece of fishing line. Now, onto the end of the fishing line depicted by the red arrow, add the 5 beads shown (one large blue seed bead, one small white seed bead, one large blue, one small white, and finally one large blue bead that is depicted by a yellow dot).
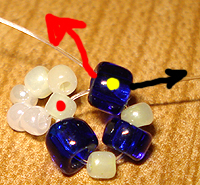
Step 3 : Now the reason I labelled the last large seed bead to be added with a yellow dot is because it's the bead that you will be crossing in this step. So just take the end of the fishing line depicted by the black arrow and string it through that bead, as shown in the picture. Pull it tight.
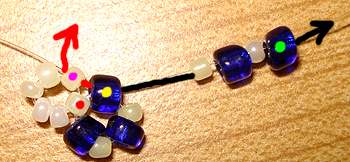
Step 4 : There is something a little bit subtle going on in this step. You take the end of the fishing line depicted by a red arrow and you string it through the pearly white small seed bead that is labelled with a pink dot. This bead is already in your pattern, so don't add a new bead! To the other end of the fishing line (depicted by a black arrow), add the four new beads shown, the last one added being the large blue seed bead labelled with a green dot.
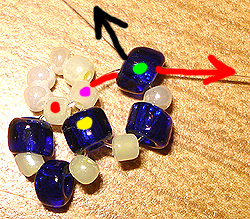
Step 5 : The large blue seed bead labelled with a green dot is being crossed in this picture by both ends of the fishing line. So all you have to do is take the end of the fishing line depicted by a red arrow and string it through that blue seed bead. Pull tight and your heart pattern should look like the picture! I know it doesn't look like a heart yet, but stay tuned. Actually it probably won't start looking anything like a heart until page 15 or so. LOL!
| Beader Comments: | |||
| There are currently no comments for this page. Add your comment today! |
