
Beading Market
Shop for beadwork made by your fellow beaders at the 3D-Beading.com Beading Market!


Welcome to the 3-D beaded rounded heart pattern instructions! If you have any difficulty following this tutorial, please post a comment at the bottom of the page on which you are stuck, and I'll do my best to help!
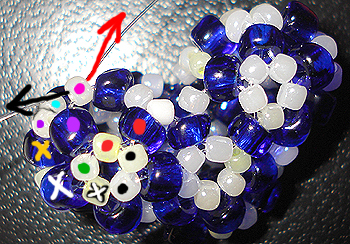
Step 1 : This is the usual crossing step. Just cross the small white bead labelled with a pink dot, with both ends of the fishing line approaching it from opposite directions. You can see from the picture that the heart really looks like one from the front and back sides now! The second hump is complete. Now all we have to do is suture the top of the heart together to link front and back. This will be the last picture of the front, back or side of the heart. From now on, I will be showing you top views of the heart pattern. That is where we will be working from now on. Now take note of the two small white seed beads located near the one we crossed (pink dot). The ones of note are labelled with a purple dot and a turquoise dot. We will be stringing through those two beads in the next step, to form yet another circle of small white seed beads!!

Step 2 : This is our first top view picture of the heart pattern! You can see that right now it's a big hole right in the center of the heart, so we must rectify that and seal up the heart! So, as I mentioned in the previous step, we must now string through those two white seed beads. Okay, so take the end of the fishing line depicted by a black arrow and string it through the 2 small white beads as shown. The first small white bead to string through is labelled with a purple dot, and the second one is labelled with a turquoise dot. You don't need to touch the other end of the fishing line in this step.

Step 3 : This step is very easy! Just add 1 new small white seed bead to the pattern! That bead is labelled with a green dot in the picture. Basically, add 1 new small white seed bead to the end of the fishing line depicted by a red arrow. You don't have to touch the other end of the fishing line in this step. Ignore the X's for now. They will be used in two steps. You'll be stringing through them all soon!

Step 4 : This step is, I hope, self-explanatory by now. Just cross the new small white seed bead that was added to the pattern, the one labelled with a green dot. Make sure the two ends of the fishing line approach the bead from opposite sides.
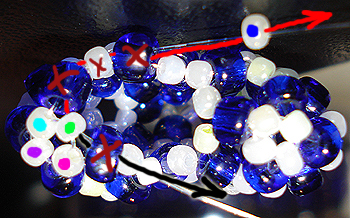
Step 5 : Okay this is the step where you'll be stringing through all those beads labelled with burgundy X's. (I know it's an odd colour, but I'm running out of colours here at page 16 of the pattern!). So take the end of the fishing line depicted by the black arrow and string it through 1 large blue seed bead labelled with a burgundy X (the one at the bottom of the picture, and to the right of that end of the fishing line). Then, take the other end of the fishing line (red arrow) and string it through those 3 other seed beads that are all labelled with burgundy X's. Then, onto the same end of the fishing line, add 1 new small white seed bead (labelled with a blue dot). This is the only bead to be adding in this step, and the rest are already in the pattern.
| Beader Comments: | |||
| There are currently no comments for this page. Add your comment today! |
