Beading Techniques

Welcome to the beading techniques instruction pages! If you have any difficulty following these beading techniques, please post a comment at the bottom of the page on which you are stuck, and I'll do my best to help!

1|2|3

Step 1

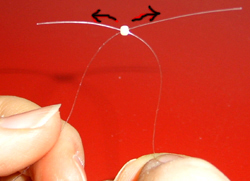
Step 1 : The most fundamental technique that is at the core of beading complex objects using right angle weave and beadweaving is the ability to cross the two ends of the same piece of fishing line through a bead, with each end approaching the bead from opposite directions (as shown in the picture). You will be doing this over and over and over in beadweaving all the beading patterns found on this site (basically at the end of every circle of beads that you add). The purpose is to lock the beads you add in position, as is demonstrated next. This site does not (at the moment) deal with other types of beadweaving such as peyote stitch, square stitch, brick stitch, ladder stitch, etc. We may one day add patterns that use those types of beadweaving, but of course it's better to excel in one type of beading than to be mediocre in many.


Step 2

Step 2 : Here we have strung 5 beads in sequence onto a piece of fishing line, as you would in any simple strung bracelet containing beads. However, the next step (crossing a bead in the sequence) will completely transform the shape of the beaded sequence. Note that the orange bead that has been labelled with a red circle will be the crossed bead.


Step 3

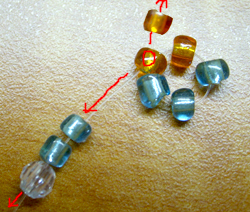
Step 3 : Voila! After crossing the two ends of the fishing line through the orange bead labelled with a red circle (in opposite directions), the line of strung beads transformed into a circle of five beads! Generally we always cross the last new bead that was added to a pattern, because any beads added onto the fishing line after the crossed bead will not be included in the circle that is made. After crossing the orange bead (with the red circle on it), simply resume adding new beads onto one or both ends of the fishing line, as shown in the diagram. Once you have added the desired number of beads that will make a circle of desired length (in our example, it was a 5-bead circle, but you could make 3-bead, 4-bead, 5-bead, etc., circles. There is no maximum bead limit, except that generally above 10 beads, the circle will lose rigidity and flop around).


Step 4

Step 4 : Now we have crossed another bead! Can you guess which bead was crossed by the fishing line? (answer: the transparent bead). Following the pictures, you could have instead added the transparent bead on the same end of the fishing line as the orange bead, and would have ended up with the same result because both ends of the fishing line end up crossing through the bead that is crossed. Also, note that if you wanted to cross, say, the newly added orange bead, you could have done so instead, and the two ends of the fishing line would have been in a different location after crossing the orange bead. And if you wanted to cross the orange bead, it would have been easier to add all the new beads pnto the same end of the fishing line and crossing the orange bead (the last bead added to that same end of fishing line) with the free end of the fishing line. You could have crossed the blue beads as well by having added the transparent bead on the other end of the fishing line (beside the orange bead) and crossing the blue bead. In essence, the important thing is that you always cross a bead that is on the very end of one of the two ends of your fishing line. The only difference between which bead you decide to cross is the location of the two ends of the fishing line after crossing. That impacts where you can go from that point (ie. how to proceed with your pattern). Note from the picture that we have made another circle of five beads but have only added 4 new beads. This is because the orange bead labelled with a red circle is the common bead between the two circles of beads that we have made. Be careful when you have common beads (in this case one, but sometimes two, three or even four) not to add too many new beads to make a new circle because your circle may be too large (ie. contain more beads than desired). That being said, you can always very easily undo! So don't be afraid to make good use of trial and error with this type of beadweaving.

1|2|3
  Beader Comments:
 Cindybell on August 3, 2016:
I am in.
 Deliverance on July 27, 2015:
Superbly ilmuiinatlng data here, thanks!
 Dianna on June 30, 2015:
Which is the inside and outside thread? Thanks!
 Bonnie Clemons on January 1, 2015:
Love to try this
 Trudi on February 3, 2014:
How an you make a ruffle where the beading goes on a right-hand slant?
 Susan on May 24, 2013:
Hi! Can you please tell me how to do ending for beaded purse with clasp? Is it tie knot at the purse clasp or at beaded part? Thanks.
 Sh on January 31, 2013:
Your website doesn't work properly on my Apple computer. In the text areas, there is one word per line. Actually, everything banks to the left side of the screen.
fyi...thanks
 Patricia Green on December 28, 2012:
Thank you for sharing
 Lynn on October 10, 2012:
@ducky... Happy to help... Pattern sent... Have removed yr e-mail so you don't get 'spammed'. Always happy to receive 'freeware' patterns... Please do not share patterns you have purchased as that is how we designers 'earn a buck'... Thanks... Lynn
 ducky on October 10, 2012:
Lynn, thank you so much for your help. I am truly greatful for this. My email address is (removed by moderator)
If there are any patterns that you would like me to share with you I will try and do so. thank you again for the help!
 Lynn on October 4, 2012:
@ ducky...Have a pattern for 'Twinkle' mouse (very similar).. if any good, leave me yr e-mail..
 ducky on October 4, 2012:
I have been looking for a particular beading pattern for over 3 years now. If anyone can help me please I would be very grateful. On the webite " I Love Beading " there is a 3D crystal mouse named " Hammi the Loving Mouse " this beading site is down. The new site is " Beading.My " I have contacted them but no answer yet. I also contacted " The Lone Beader " who named the mouse. iCy from the first site mentioned in her post that she got the pattern from a Japanese book. I have searched the web forever it seems and still can not find this pattern. I will pay for the pattern if anyone happends to have it. Thank you
 PINK 4 ME on September 5, 2012:
keren
 Rosemarie Lasky on July 12, 2012:
Hi I just happened upon your web site.What a pleasure hope I can learn a lot. Please keep up the beautiful work.
 Annie on April 30, 2012:
When I try to croos the bead with the fishing line and I pull the fishing line together , the bead pops out at the end of the crossing it doesnt tie together like in the picture....
 Lynn on October 31, 2011:
AuntDD67 - go to the home page and scroll down to the bottom... there is advice there for printing off the site.
 AuntDD67 on October 30, 2011:
I'm having a problem when I print instructions, sometimes the text and illustrations overlay or the sidebar ads overlay the instructions. How do I prevent this in the future?
 Birdie on May 23, 2011:
Kudos to you! I hadn't thugoht of that!
 nagwa on May 15, 2011:
woooooooooooow
 Erin Small on March 14, 2011:
How do you?
 Kat on February 22, 2011:
Would appreciate Paso Doble Bracelet Pattern instructions. We understand there are some very nice designs that can be done using a variety of beads.
 BlueOpalSpirit on January 28, 2011:
I am looking for a pattern to make large beads by bead weaving them... any ideas? thanks in advance!
 rossa on January 7, 2011:
good job
 anat dor on October 16, 2010:
I'm an amateur beads
 Julia on June 26, 2010:
beadspage.com has 2 free video lessons on its main page. You can learn and buy ebooks on how to bead. A singapore registered company. Material are cheap too.
 izza aulia on February 21, 2010:
aku pengen nyoba nich.......
 AJ on September 4, 2009:
I've never done this kind of beading before - but I'm excited to try it and appreciate all the awesome patterns you have here!
 Xtina on July 13, 2009:
So when i start a pattern i start in the middle of the string? Especially the Chinese Lantern.
 millie on April 28, 2009:
I love this site fabulous patterns I love the great instructions
 Debbie on December 13, 2008:
Hi love your site and fab instructions. Have a wonderful Christmas & fantastic beading 2009
 Priscilla on September 18, 2008:
Thanks for providing all of these great ideas. I haven't started beading yet, but you've kept things simple. I can't wait to give it a try.
 Allegra on July 21, 2008:
The teddy bear pattern is next on my to-do list because everyone has requested it! It's quite in demand!
 Laura on July 20, 2008:
Do you have the teddy bear pattern? I would like to try to make one.
 Allegra on June 26, 2008:
Hey Laura, I promise you the beaded teddy bear pattern will be up and ready for you to make as a Christmas tree decoration!! I'm very thankful for your patience and support and wonderful words!
 Laura on June 25, 2008:
Great site! I love the teddy bear, he'd make a great addition to Christmas presents as a tree ornament.

 Lindsey on May 29, 2008:
I love this website it is like heaven to a beader who loves to find awsome new patterns. Please add new directions soon.
 Christine on January 9, 2008:
This is a great website! I've made all the models posted! Can't wait to see more!
 Eric on December 31, 2007:
Does anyone know how to tie a knot? That doesn't seem to be explained here. Thanks!