
Beading Market
Shop for beadwork made by your fellow beaders at the 3D-Beading.com Beading Market!


Welcome to the 3-D beaded rounded heart pattern instructions! If you have any difficulty following this tutorial, please post a comment at the bottom of the page on which you are stuck, and I'll do my best to help!
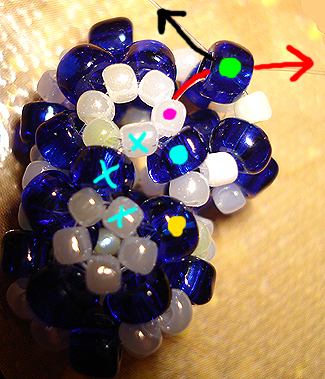
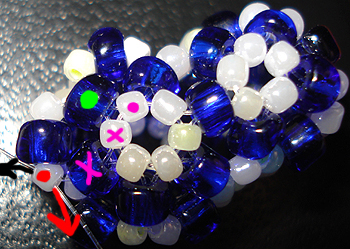
Step 1 : Now cross the last bead added, that is, the large blue seed bead labelled with a green dot. Now we are actually almost done circling the circle of 6 small white seed beads, with only one more to go, and then we'll rotate the heart model and you'll see that you can actually start to tell it's a heart now!
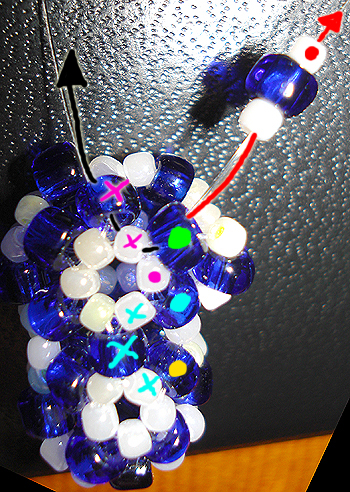
Step 2 : Now here we'll be stringing through two beads that already exist in our pattern, and we'll be adding a few more new ones as well, to completely finish off this section. Take the end of the fishing line depicted by the black arrow and string it through the 2 beads labelled with pink X's. The first one is the small white seed bead that is the last of our 6 in the circle, and the second one is a large blue seed bead. To the other end of the fishing line, add the 3 new seed beads shown in the picture. The last new bead to be added is the small white seed bead labelled with a red dot.
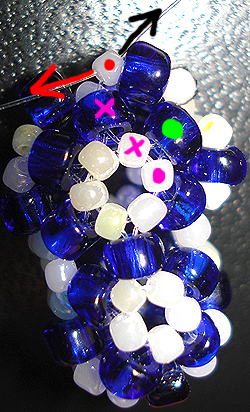
Step 3 : Now cross the small white seed bead labelled with the red dot. We are now done circling the circle of 6 small white seed beads! In the next picture, you'll see the exact same picture shown here, except that it will be oriented horizontally, so you'll see where we are in terms of making the heart!
Step 4 : This is the same picture as the previous step, except it's oriented horizontally and you can see that we are well on our way to finishing the beaded heart pattern, except that we must finish the very last hump in our heart. We have the apex (bottom pointy part) and we have one hump totally finished. All we are missing is that second hump (left hump in the picture). We are close!
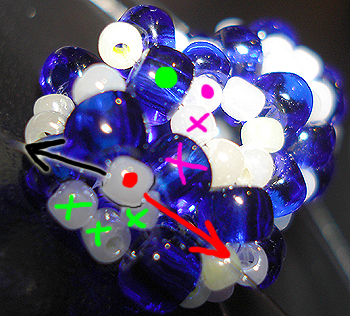
Step 5 : So here is a picture of the side of the heart. We must work our way up the side of the heart pattern. Just like a surgeon sutures two ends of skin together, we are going to stitch the front and back sides of the heart together via the side of the heart. So here we are going to form another circle of 6 small white seed beads. There are 4 already present in the pattern, so we will only have to add 2 new small white seed beads in the next step. We are simply going to string through those 3 small white seed beads labelled with green dots. This will be explained in the next step, where you will see a full side angle view of those beads.
| Beader Comments: | |||
| There are currently no comments for this page. Add your comment today! |
