
Beading Market
Shop for beadwork made by your fellow beaders at the 3D-Beading.com Beading Market!


Welcome to the 3-D beaded hello kitty pattern instructions! If you have any difficulty following this tutorial, please post a comment at the bottom of the page on which you are stuck, and I'll do my best to help! Continue to page 5 for the latest pattern by Lucy (which contains diagrams).

Before you begin ...
Materials: 1.5 meters of fishing line, 44 transparent 4mm plastic round beads or size 6 (large) E-seed beads (for the skin, front and back), 23 pink or blue size 6 (large) E-seed beads (for the border), 8 blue or orange size 6 (large) E-seed beads (for the bow, front and back), 4 black size 6 (large) E-seed beads (for the eyes, front and back), 2 red or yellow size 6 (large) E-seed beads (for the nose, front and back)
Time required: 1 to 2 hours
Techniques: Beadweaving, right angle weave
Difficulty: Intermediate (should be able to do Feminine Bracelet)
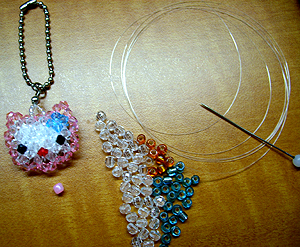
Step 1 : Gather your materials first! What you will need is what you see: A pin or sewing needle, to help the fishing line through the beads if they give you trouble (what I do is use it to pry up the bead in question to free up the hole). Second, a nice long piece of fishing line (I got mine from Canadian Tire, 100 Yards for $4.00). Make it about 1.5 meters or so to be safe. Unlike with friendship bracelets, you can always add more later if you run out, but it's nice not to have to. Third, have your model beside you! Well, that's what I do anyway. Since you guys don't have a model, you'll have to follow my guide here when making it for the first time. Next time, you'll have your own model to follow! The beauty of beading is there are no tricks. So once you learn how to bead proficiently, you'll never need another lesson as long as you have the model in front of you. Or you can just invent a pattern! Finally, of course, you'll need the beads!! In the picture, you'll see all the beads I used all counted out. Of course, you don't have to count them out, as long as you're sure you'll have enough of each colour you plan to use. Okay, let's get started!

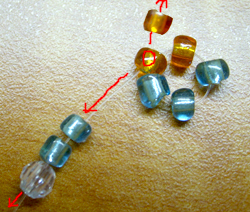
Step 2 : Does this picture look familiar? The next three pictures are straight from page 1 of techniques. Pretty straight-forward, more details on that page. Basically, just string 3 turquoise beads and 2 orange beads on a piece of fishing line. The bead labelled with a red dot will be crossed in the next picture. This means you will traverse that bead in opposite directions with the two ends of the fishing line, as you will see in the next picture.
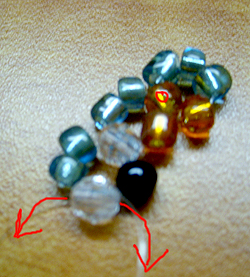
Step 3 : Now that we've crossed the bead labelled with the red dot, we keep adding more beads to both ends of the fishing line, as shown in the picture.

Step 4 : Now you see that we have added all the new beads you see in the previous step. So now we cross the transparent bead that was last added with both ends of the fishing line (in opposite directions).
Step 5 : Okay here I'm starting to skip steps because hopefully you are learning to spread your wings and to fly! Can you tell what I skipped? The adding of the two blue beads on the left side (i.e. that end of the fishing line) and the black bead on the right (end of the fishing line). Then the adding of the transparent bead and crossing the transparent bead with the two ends of fishing line in opposite directions. On to page 2 for further steps!
| Beader Comments: | |||
| Zennie Brun on January 27, 2016: | |||
| very nice |
