
Beading Market
Shop for beadwork made by your fellow beaders at the 3D-Beading.com Beading Market!


Welcome to the 3-D beaded hello kitty pattern instructions! If you have any difficulty following this tutorial, please post a comment at the bottom of the page on which you are stuck, and I'll do my best to help! Continue to page 5 for the latest pattern by Lucy (which contains diagrams).
Step 1 : Add two blue beads on the left (end of the fishing line), one transparent bead on the right (end of the fishing line), then add another transparent bead and cross it. (Remember the two ends of fishing line approach the bead in opposite directions).

Step 2 : Oh boy, two steps in one... but so easy! First step: Add two blue beads on the exterior side of the pattern (on the same side as the other blue beads) and one yellow bead on the interior side of the pattern, then add one transparent bead to be crossed. Second step: Add two blue beads on the exterior side of the pattern, one transparent bead on the interior side of the pattern, then cross a transparent bead.
Step 3 : I think you can see where we are going with this. We are basically going through the cycle of adding beads and crossing the last bead added to the pattern in each cycle. Every circle of beads so far has consisted of 5 beads, so it is a fairly simple pattern to follow so far. In this step, we added a black bead to the interior side, with two blue beads to the exterior side of the pattern, then crossed another transparent bead. Then, we added a transparent bead to the interior side and again two blue beads to the exterior side of the pattern, and crossed a transparent bead that was added last. I hope you've noticed that the blue beads are always added to the exterior of the hello kitty pattern, as they form the border.
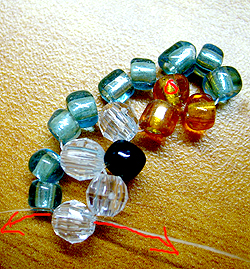
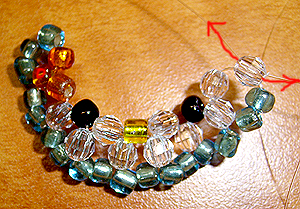
Step 4 : The picture skips a few more steps, but I'll go through them verbally. We left off the previous step finishing off the circle of 5 beads to the right of the one containing the hello kitty's eye. In the next circle of 5 beads to be added, it's important to note that the hello kitty pattern turns. Instead of adding two blue beads to the exterior end of the fishing line, add 3 blue beads. Then simply add another transparent bead and cross it with both ends of the fishing line in opposite directions. You have now turned! The next circle of beads in the hello kitty pattern consists of a circle of 4 beads only. Simply add 1 blue bead to the exterior and one transparent bead to the interior of the pattern, then add one more transparent bead and cross it with both ends of the fishing line. Then do that all over again because the next circle of beads is identical. Then add one orange bead (marked with a blue X) to the interior end of fishing line, and one blue bead (marked with a red dot) to the exterior end.

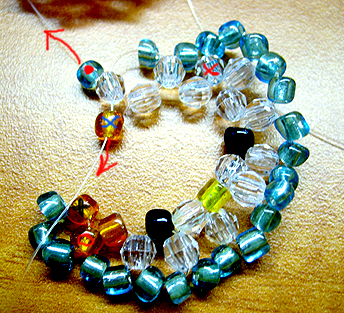
Step 5 : Now we are going to try to finish this circle without adding new beads by re-using beads already in the pattern that we added earlier. This will link our hello kitty together so that we can start filling in the centre of the pattern. So, for now, take the end of the fishing line depicted by a red arrow (which is coming out of the blue bead with a red dot on it) and insert it through the orange bead marked with a black X in the direction shown by the red arrow-head. Leave the other end of the fishing line alone in this step. It should already be coming out of the orange bead with a blue X on it in the direction shown by the black arrow.
| Beader Comments: | |||
| There are currently no comments for this page. Add your comment today! |
