
Beading Market
Shop for beadwork made by your fellow beaders at the 3D-Beading.com Beading Market!


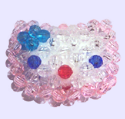
Welcome to the 3-D beaded hello kitty pattern instructions by Lucy! If you have any difficulty following this tutorial, please post a comment at the bottom of the page on which you are stuck, and we'll do our best to help! For Allegra's original photo pattern, see pages 1 to 4.
Before you begin ...
Materials: 1.5 meters of fishing line, 44 transparent 4mm plastic round beads or size 6 (large) E-seed beads (for the skin, front and back), 23 pink or blue size 6 (large) E-seed beads (for the border), 8 blue or orange size 6 (large) E-seed beads (for the bow, front and back), 4 black size 6 (large) E-seed beads (for the eyes, front and back), 2 red or yellow size 6 (large) E-seed beads (for the nose, front and back)
Time required: 1 to 2 hours
Techniques: Beadweaving, right angle weave
Difficulty: Intermediate (should be able to do Feminine Bracelet)
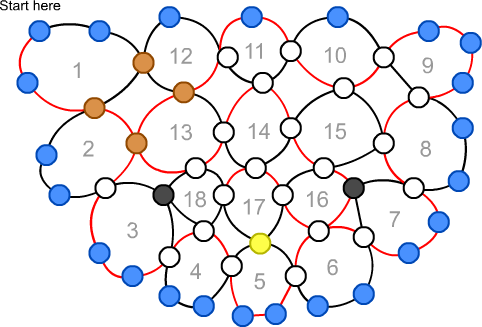
Step 1 : 1 - String 3 blue beads and 2 orange beads, allow them to fall to the center of your thread. Cross the last orange bead added with the opposite end of your thread to make a circle.
2 - Add 1 orange bead to your red thread. Add 2 blue beads to your black thread. Add and cross a white bead.
3 - Add 2 blue beads to your red thread. Add 1 black bead to your black thread. Add and cross a white bead.
4 - Add 1 white bead to your red thread. Add 2 blue beads to your black thread. Add and cross a white bead.
5 - Add 2 blue beads to your red thread. Add 1 yellow bead to your black thread. Add and cross a white bead.
6 - Add 1 white bead to your red thread. Add 2 blue beads to your black thread. Add and cross a white bead.
7 - Add 2 blue beads to your red thread. Add 1 black bead to your black thread. Add and cross a white bead.
8 - Add 1 white bead to your red thread. Add 2 blue beads to your black thread. Add and cross a white bead.
9 - Add 3 blue beads to your red thread. Add and cross a white bead.
10 - Add 1 white bead to your red thread. Add one blue bead to your black thread. Add and cross a white bead.
11 - Add 1 blue bead to your red thread. Add 1 white bead to your black thread. Add and cross a white bead. Pay attention during the next step!
12 - Add 1 blue bead to your black thread. Pass your thread through the orange bead shown in the pattern. You do not need to add a new bead, the orange bead you need is part of the first bead circle you made.Add and cross an orange bead.
Please note - From here onward the word "add" means you need to add a new bead. The word "pass" means you are passing your thread through a bead that is already in the pattern!
13 - Pass your red thread through the orange bead shown then add 1 white bead to it. Add and cross a white bead.
14 - Pass your red thread through the white bead shown. Add 1 white bead to your black thread. Add and cross a white bead.
15 - Pass your black thread through the 2 white beads shown. Be careful, make sure you are passing through the right beads! Add and cross a white bead.
16 - Pass your red thread through the 2 beads shown, the first is black, the second is white. Add and cross a white bead.
17 - Pass your red thread through the white bead shown. Pass your black bead through the yellow bead shown. Add and cross a white bead.
18 - Using your black thread pass the three beads shown. Tie a knot.
Well done, you have completed the first half of your hello kitty head!
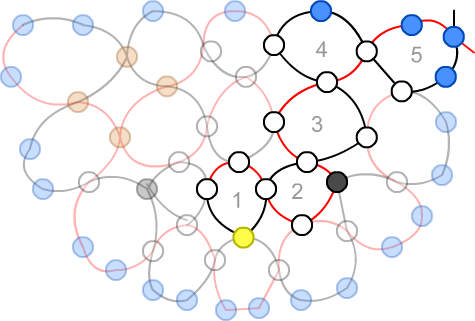
Step 2 : The next diagram simple shows how to get to where you need to be to start making the back of your kitty. It doesnt matter how you get there, this is just an example!
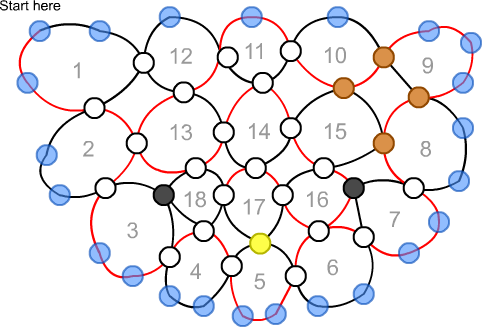
Step 3 : Now turn your kitty over so you are looking at the back.
You will notice that the final diagram is fairly similar to the first one. This time we don't need to add any blue beads, just use the ones that you have already threaded.
If you are having problems completing the Hello Kitty, don't forget you can leave a comment below and we'll try to help.
Well done, your Hello Kitty is finished!
| Beader Comments: | |||
| There are currently no comments for this page. Add your comment today! |
