
Beading Market
Shop for beadwork made by your fellow beaders at the 3D-Beading.com Beading Market!


Welcome to the 3-D beaded hello kitty pattern instructions! If you have any difficulty following this tutorial, please post a comment at the bottom of the page on which you are stuck, and I'll do my best to help! Continue to page 5 for the latest pattern by Lucy (which contains diagrams).

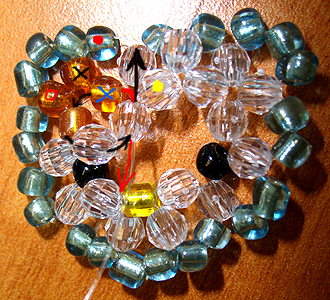
Step 1 : Now take the end of the fishing line depicted by the red arrow and string it through the orange bead marked by a blue X, as shown in the photo. You are essentially crossing the orange bead marked by the blue X. What makes this new circle that we just formed different from the rest is that it includes a bead that was already in the pattern way earlier on (the orange bead marked by a black X). So instead of adding a new orange bead into our new circle, we simply looped through an existing one, and the effect is the same as if we added a new one, except that we have now connected the pattern all together. You can see hello kitty's face taking shape now!
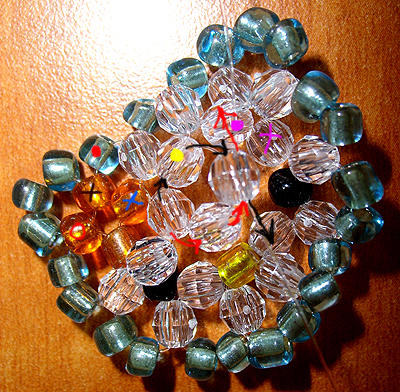
Step 2 : Hopefully you have now learned something about stringing the fishing line through beads that are already present in the pattern. You must now string the end of the fishing line depicted by the black arrow through the bottom orange bead (the unmarked orange bead) that is already present in the pattern. After that, add two new transparent beads onto the pattern (onto the same end of the fishing line). Cross the last transparent bead added with the other end of the fishing line (the one depicted by a red arrow). The yellow dot will be important in the next step.
Step 3 : Now follow the end of the fishing line depicted by the black arrow through the transparent bead marked with a yellow dot, which is already present in the pattern, so don't add a new bead! Then add a new transparent bead to the end of the fishing line depicted by the red arrow. Finally, add another new transparent bead to be crossed by both ends of the fishing line. The beads with the pink dot and pink X will be the target of the next step!
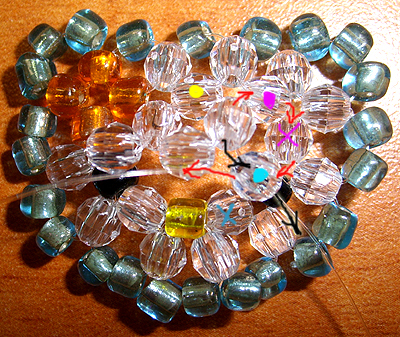
Step 4 : Now follow the end of the fishing line depicted by the red arrow through the transparent bead that is marked by a pink dot (which is already present in the pattern), then through the transparent bead marked by a pink X (also already in the pattern), then add a new transparent bead (marked by a turquoise dot) and cross it with both ends of the fishing line. The bead marked with a turquoise X will be used in the next step.
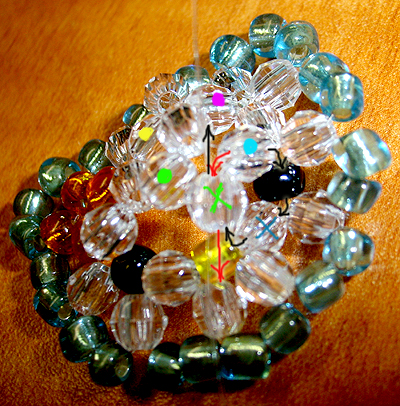
Step 5 : Now follow the end of the fishing line depicted by a black arrow from out of the transparent bead marked with a turquoise dot, through the all-black bead (the eye - which is already in the pattern), and through the transparent bead marked with the turquoise X (also already in the pattern). Then add a new transparent bead (the bead marked by a green X) and cross both ends of the fishing line through it. The bead with the green dot will become important in the next step.
| Beader Comments: | |||
| There are currently no comments for this page. Add your comment today! |
