
Beading Market
Shop for beadwork made by your fellow beaders at the 3D-Beading.com Beading Market!
Welcome to the Inkscape beading diagram tutorial! If you have any difficulty following this tutorial, please post a comment at the bottom of the page on which you are stuck, and I'll do my best to help!
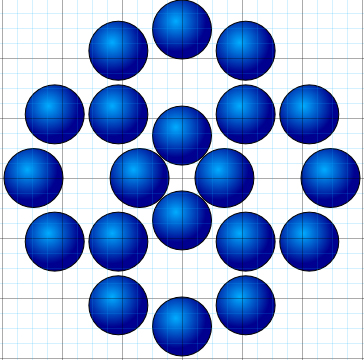
Finished Diagram of Beads Only: I have included here a screenshot of what the diagram should look like after deselecting all the ellipses. Now we are able to add all the numbers!
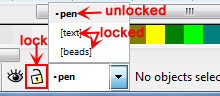
6) Now we will type all the bead numbers. Relax, this is the easiest part! Before we get to actually typing, it would be much worth our while to add our text to a new layer in the document. That way, the text doesn't interfere at all with the beads, and we can select the text only or the beads only with our selection tool, even though they overlap. So we are going to go ahead and make a new layer now. It's important that you not skip this step because it will make your life SO much easier later. To make a new layer, go to Layer >> Add Layer. A pop-up box will ask you to name your new layer. Click OK. Now we want to lock the bead layer to prevent the beads from interfering or being selected by the selection tool when we only want to select the text. To lock the bead layer, go to the bottom left corner of your screen, which contains the list of layers in the document. And to the left of this drop-down list is a lock symbol. Choose the bead layer (called Layer 1 by default) from the drop-down menu and then click the lock symbol. This locks the bead layer so that the beads cannot be selected by the selection tool. The screenshot shows what the lock and drop-down menu looks like (but at a later stage, when I was drawing the arrows using the pen tool, and both the text and bead layers were locked). Now choose the unlocked text layer from the list of layers (we don't want to be drawing in the bead layer!) You're done! We can start adding our text now.
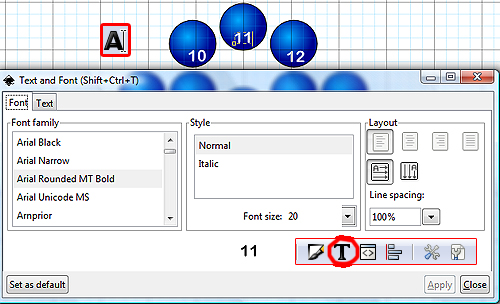
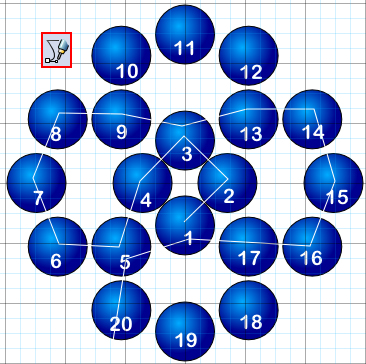
7) To add text, the first thing we need to do is decide on a font size, font family, and font color. Then we can go crazy typing up all the numbers on all the beads. This is because once we set this font attributes, the program will remember the last used style and apply it to all new text. This is because we set the preferences to do this way back in the first few steps of these instructions!! (otherwise, we'd have problems right now). See, I don't make you do things for nothing all the time! Anyways, click on the Text tool. This tool looks like a capital A with a typing cursor beside it, and is located in the left toolbar. I have a picture of it in my screenshot (hovering over the image surrounded by a red box, which is NOT where it is located in the program!) So with the type tool selected, I will now guide you through the steps of adding numbers to all of our beads:
A) With the type tool selected, click on a bead and type a number on it. It will probably not at all be the style, size, or color you want. That's okay, we'll fix this now. Now that you have typed a number, we can easily format it and you can see the preview as that number changes appearance. After that, Inkscape will remember your settings for all future numbers. So, we will start with font family and font size before font color. After typing the number, click on the T button, which is at the top of your screen, and shown circled in red in the screenshot, although not where it is located in the program! It is in the top toolbar, to the immediate right of the Fill and Stroke button, which we used earlier and will use again soon! Once you've clicked the T button, the Text and Font box will pop up (pictured in the screenshot!). From here, it's self-explanatory. Select the font family, style, and size of your choice and then click close. You'll see the number change before your eyes to know what looks good. You can see that my numbers are Arial Rounded MT Bold, style Normal, font size 20.
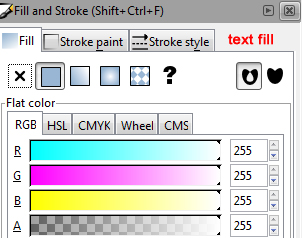
B) We will now concern ourselves with font color. We want a font color that contrasts the best with our bead color. I chose white on navy blue beads. To change the font color, we use none other than the Fill and Stroke box, which you may remember from earlier when we colored the beads! The Fill and Stroke button is the brush tip in a white box icon in the top toolbar, immediately to the left of the T button (you can see it in my screenshot to the left of the T button). Click this button, and then select the fill color and stroke color (I removed stroke by clicking the X button under the Stroke Paint tab because I didn't want my text to be stroked). I chose a solid fill color of white by dragging the sliders in the Fill tab. You can see what settings I chose in the screenshot of the Fill and Stroke box. Under Stroke Paint, I clicked the X button.
8) Now that the text has been formatted to our liking, we can go nuts with typing all the numbers on all the beads. This part is so easy. It's much easier than in adobe illustrator, with no keyboard shortcuts required! All you have to do is click on the next bead, and type the number that goes on it. Then, just click on the following bead and type the next number. Keep going until all the beads are done! You don't have to "end" the text box with any keyboard shortcuts like in adobe illustrator. Inkscape knows that you are done with one text box when you click to start a new one. I really like that about this program! Okay now that you have typed all the numbers on all the beads, if you find that you don't like how they look afterall, you can change it very easily because we were clever enough to lock the bead layer, so all you have to do is click on the selection tool (black arrow tool), drag over the whole image, and all the text will be selected. Then, simply click the T button to adjust font style and size, or the Fill and Stroke button to adjust font color and stroke!
9) Okay we are now done with the text and beads. Now for the grand finale: the arrows!! It sounds daunting, but honestly, after all that, I think you'll possibly find them to be one of the easier steps. But I won't speak too soon. By the way, if any of this seems like an overwhelming amount of information, it's only because I'm being extra thorough to teach you how to use this program well. Once you get into practice with it, you'll find it's quite easy to get the hang of it, and just takes practice! Okay, enough preamble, time to add the arrows.
Before adding the arrows, we will make another new layer the same way as before, and lock the text layer. So, go to Layer >> New Layer to make the new layer and name it pen or arrows (we'll be using the pen tool to make the arrows). Then, from the drop-down menu in the bottom left corner of your screen, select the text layer and click the lock button. Then go back to the pen/arrow layer and start drawing (which I will teach you now).
10) To draw with the pen tool, you must first click on the pen tool icon in the left toolbar. The pen tool icon is immediately below the pencil icon, and is the 7th tool from the bottom. Don't confuse the pen tool with the calligraphy tool below it, whose icon also resembles a pen. The pen tool icon looks like a fine-tipped ballpoint pen drawing a thin line with first a straight edge then a curvy edge. You can see a picture of the pen tool icon boxed in red in my screenshot (but this is not its location in the program screen!) With the pen tool selected, click on the first bead (bead 1). This begins the pen path. Now simply click once per bead on each successive bead in the pattern to continue the arrow line. In other words, click once on bead 1, then once on bead 2, then once on bead 3, etc. When you have reached the last bead in the pattern, press Enter on your keyboard to end the pen path. I recommend that before pressing Enter, you give your arrow a bit of a tail beyond the last bead (ie, click once outside the diagram beyond the last bead). You'll probably notice that once you press Enter, your nice arrow line becomes filled in with color, which is not what we want. The reason it fills with color is that right now the Fill and Stroke option is to Fill rather than to Stroke. We will change this next.
11) To change the Fill and Stroke options for the pen tool, do exactly what you did for the beads and for the text! Click on the Fill and Stroke button (icon looks like a paintbrush, beside the T button at the top of the screen). We are going to do exactly what we have done before. Under the Fill tab, click the X button to remove the fill on the arrow. Your arrow should now be invisible. We will now stroke it. Under the Stroke Paint tab, click on the solid fill button (immediately to the right of the X button). Choose your color using the sliders. The arrow will change color as you drag the sliders so you can choose whichever color contrasts the best with the image. Keep the Fill and Stroke box open for the next step.
