Create Beading Patterns with Inkscape (free software)

Welcome to the Inkscape beading diagram tutorial! If you have any difficulty following this tutorial, please post a comment at the bottom of the page on which you are stuck, and I'll do my best to help!

1|2|3|4|5|6

Document Properties Page Tab

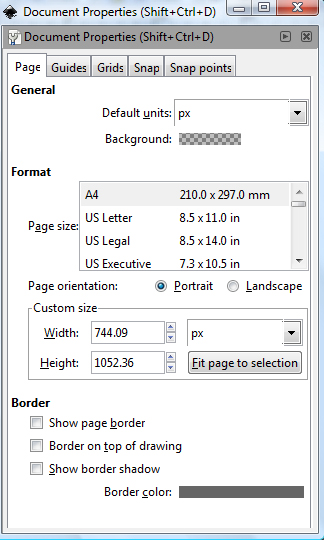
A) In the Page tab, deselect "Show page border" and "Show border shadow" under "Border" at the bottom of the window. Notice that the default background is set to transparent (beside "Background" is a checkered box icon, which is the symbol meaning transparency). This means all your diagrams will have a transparent background. If you don't like that, you can click that box to choose a solid colour as your diagram's background colour. I personally like transparency because it makes the diagram look less bulky on the page. The Default Units are pixels (px), which is a unit of measure used on the internet. Leave it unchanged because it's the unit we will be using to set our grid size and our ellipse size.


Document Properties Grid Tab

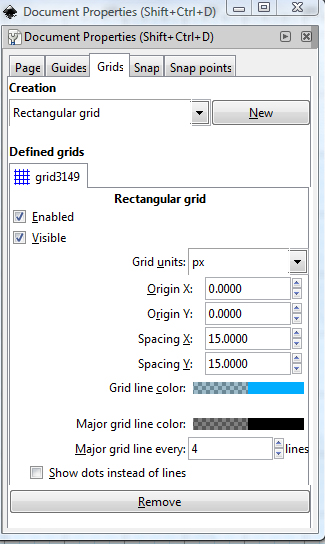
B) In the Grids tab, click the "New" button. The grid options we already selected in the Inkscape Preferences menu should appear in the tab. To reiterate them, I am showing a screenshot of what your screen should look like after you click the New button. The grid should show up on your screen as well. The default page zoom is 35% right now, but we will change this later to 100%, so that you can see the grid properly. Note that you can remove the grid by clicking the Remove button. If you create a new grid without removing this one, they will both show at the same time. You can also simply make the grid invisible without removing it, by deselecting the "Visible" check box.


Document Properties Snap Tab

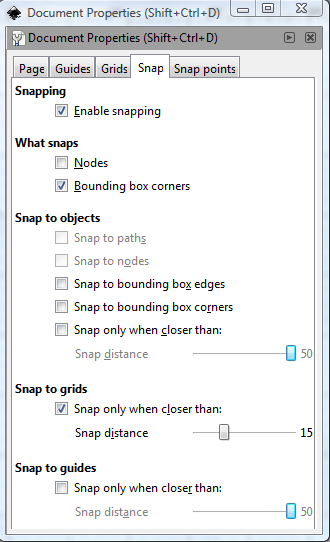
C) In the Snap tab, make sure "Enable snapping" is selected. Under "What snaps", select "Bounding box corners". Under "Snap to objects", deselect "Snap only when closer than", such that the Snap distance slider is grayed out. Under "Snap to grids", select the check box beside "Snap only when closer than". This will blacken the Snap distance slider. On the slider, slide to 15, which means that our ellipses will snap in increments of 15 pixels, which is the grid size that we set! This will ensure that our ellipses will fit perfectly on our grid with little effort. Under "Snap to guides", deselect "Snap only when closer than", which will gray out the Snap distance slider.


Setting the Page Zoom to 100%

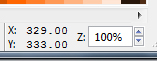
5) We are almost done personalizing Inkscape for drawing beading diagrams! The last step is to set the zoom to 100% instead of 35%. The zoom box is in the bottom right corner of the screen. Simply move the cursor over the box and delete 35 and type 100.

6) The very last step is to make sure that Inkscape will always remember all of our preferences so we don't have to enter them again!Select File >> Save As... and then under Places, double-click the word "templates". Type the word "default" (without quotations) beside "Name:" and then click the Save button. From now on, the program will remember all your preferences and properties, and make them the default.

We have now finished customizing Inkscape to meet our needs. You can test out whether Inkscape remembered your settings by closing and reopening the program. If you followed these instructions correctly, when you reopen the program, a grid should appear on your screen.

Now I will guide you through drawing a beading diagram using Inkscape!

Part II - Drawing a Beading Diagram


Drawing the Ellipse Shape

1) The first thing we need to do is draw an ellipse. We will conform the ellipse to a circular shape and colour it with our desired colour scheme.

Follow these steps to make the ellipse, shape it, and snap it to the grid:

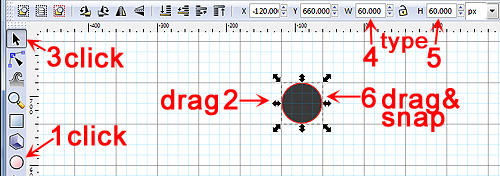
A) Click the ellipse tool. It's along the left toolbar, about mid-way down vertically. In the screenshot I have taken, the red arrow pointing to it is labelled "1 click", signifying that this is step 1, and to click on the ellipse icon.

B) Move the cursor onto the grid and drag it to draw your ellipse. It can be any shape and size because we are going to perfect the shape and size in a couple of steps. Any ellipse on the screen is fine for now.

C) Click on the arrow icon, which is the selection tool. It's at the very top of the left toolbar. In the screenshot, the arrow pointing to it is labelled "3 click".

D) You should now see 8 black arrows surrounding your ellipse (as in the screenshot). If not, click once on the ellipse that you drew. You should see boxes at the top of the screen that show the width and height of your selected ellipse. The With box is labelled W by the program, and the Height box is labelled H by the program. We want the width and height of our ellipse to be 60.000 pixels (px). So whatever it says in those two boxes right now, change them both to say 60.000, as shown in my screenshot (arrows 4 and 5).

E) Now our ellipse is the right shape and size, but we need to snap it to the grid. If you'll notice, your ellipse is now a perfect fit for one of your grid cells. I cleverly planned it this way, because your grid is at intervals of 15 pixels, and there is a major divisionary line (the black lines) at every 4 divisions, ie, every 60 pixels. So now your 60 by 60 pixel ellipse is a perfect fit and should snap perfectly into the grid. Also, our snapping distance is 15 pixels, so when you drag the ellipse it will drag in the increments of our grid. So that's exactly what we will do now. Drag the ellipse until it snaps into place in the grid, in the middle of a black square, as shown in my screenshot.

If you screwed up any of the above steps to make the ellipse, simply delete your ellipse by selecting it (using the selection tool) and clicking the delete button (not backspace) on your keyboard.

Now we can change the color scheme of our ellipse (ie, our bead, LOL)! Follow these steps to set the ellipse color scheme: (Go to Page 3)

1|2|3|4|5|6
  Beader Comments:
 Meech on October 3, 2015:
This was so helpful! Thank you for taking the time to do this!!!
 Lynn on February 7, 2014:
Inkscape is continually upgrading their product which means our original instructions are a little outdated... The basic info. is good and with continued use of your version, I am sure you will be able to answer your own questions, even if by trial & error... We are not able to keep checking for updates on the program and re-writing the instructions... This product is worth your continued effort to master.
 Melissa on February 7, 2014:
I am having the same problem with the snap tab, no Snapping, no What snaps. I am using Inkscape - 0.48.2-1 SNOWLEOPARD.dmg. Thanks for your help!
 Renee on January 6, 2013:
I am having the same problem with the snap tab, no Snapping, no What snaps, and no Zoom box. I am using (0.48 ) Thank you for any help you can give me. My email is: sedira44256@yahoo.com
 Katie on January 5, 2013:
I cannot find the Page Tab in the Inkscape I downloaded. My first page is New document. Would you please guide me to the page tab page so I could follow your instructions? Thank you
 Janice on September 10, 2012:
My snap to grid is different and I can not save my settings. Please help me. I am using the newest version
 Lynn on August 29, 2012:
Dawn... Not able to help with the 'snap' function as I have the older version and I am not sure what problem you are having with saving?... When you save, how are you doing it?... Leave me yr e-mail and I will contact you to see if I can help.
 Dawn on August 27, 2012:
I am unable to follow all of your instructions - the snap tab in my version of inkscape is different, and i am unable to save as a template as it goes to my documents folder. Any suggestions please?
 Robin on March 14, 2012:
I'm having the same problem as Donna in Brisbane from 2 years ago - " Donna, Brisbane, Australia on May 3, 2010:
Inkscape looks fantastic but i have a couple of problems. In step 4 C the snap tab looks different in my version (0.47) - there is no Bounding corners box to tick and it has other features there as well." I am using version .48 on Vista. Any help here would be greatly appreciated. Thanks!
 Eileen on January 23, 2012:
I cannot save this correctly - I have Windows 7 and all that comes up when I click on "Save AS" is "Recent Places" and there is nothing listed anywhere for "Templates"; also, when I click on"Snap", I do not get the option for "Enable Snapping" - it goes right to "Snap to Objects", etc.
 zansplace on January 5, 2012:
I downloaded the new version .48 and then followed Anzu's suggestion below (December 22, 2010) for saving the template file to C:ProgrmFiles\Inkscape\share\Templates\default.svg . When asked, I told it to replace current file. Hope that was right.
 Allegra on November 13, 2011:
Hi Talia, what version of Inkscape are you using? It is my understanding that they have updated it since I made this tutorial, and that certain menu items changed name and location. Let me know what version you have (in About in Inkcape) so that I can attempt to do the same thing you are trying to do in your version and let you know (or let me know if you already figured it out!) Hope you make lots of beading patterns!
 Talia on November 3, 2011:
i did all that you explain in page 1 and 2 - when i wanted to save - there was no places and no templet - so it didn't save all the new preferences - what should i do ? thank you
 Sharon Mahon on October 25, 2011:
Hope this works
 Chris W on July 15, 2011:
I hope this fits all my needs.
 Dennis Dougherty on April 29, 2011:
Thank you.
 Jen on March 8, 2011:
@ Circe The Witch. This isn't really ideal for peyote. But there are some free programs available on the internet that are great for peyote designing.
 Circe The Witch on March 7, 2011:
I am hoping this program will create a pattern I need to do some peyote beading which will give me picture
 Anzu on December 22, 2010:
To the previous people, browsing Inkscape FAQ would have helped you:
You can save any document as the default template by writing it to ~/.inkscape/templates/default.svg on Linux and [inkscape dir]/share/templates/default.svg on Windows.

In my case, I had to save it to C:\Program Files\Inkscape\share\templates
 Caroline Morrison on August 10, 2010:
I started to install the inkscape. It is a lot of work. I have a problem. I have Windows XP 2007 version. on it I cannot find as it says on p2 #6 : se;ext file>>save as...then under placesdouble click templates. I do not have or cannot find places. Where is it? As a result I have to reinstall what I already had done yesterday
 Donna, Brisbane, Australia on May 3, 2010:
Inkscape looks fantastic but i have a couple of problems. In step 4 C the snap tab looks different in my version (0.47) - there is no Bounding corners box to tick and it has other features there as well. Also I'm using XP and I don't have a "places" section so that i can save as. Any suggestions. Thanks for all of your hard work
 ¾Ôª­´Ò ËÍÁàÈÃÉ°Õ on March 17, 2010:
Good
 thazia on March 2, 2010:
uhm...
i've followed your instruction and i've doon well
only... i get stuck oon the saving part. i can't find that places thingy and also that templates so everytime i open inkscape i need to arrange the grids again....
any suggestion??
thanks!!
 Allegra on February 11, 2009:
Hi AL, the program should have no connection to the internet whatsoever. Your pattern files should be saved to your home computer. I've never tried printing from the program directly, but if that's a problem, you can export your pattern as a .png format (it's in these instructions how to do it, towards the end) which is a picture file, and you can print that picture file from windows explorer. Hope this helps!
 AL, London. on February 10, 2009:
After saving a design, when I want to reload it next time it wants to take me back online. Doesn't the design get saved on my computer? Also, the program crashes when I try to print. What's wrong?
 Allegra on January 14, 2009:
My version is also 0.46. Was your star done in illustrator? I personally find Inkscape easier to use! How funny that's it's free too! Although quite frankly, adobe is famous for making very cryptic programs, where all the functions are as well-hidden as they can possibly be. Oh, and 400 page manuals to go along with them. LOL! By contrast, I managed to figure out Inkscape in one afternoon, and hardly glanced at the help file.
 Jen Lawson on January 10, 2009:
That's alright, it's there!. It was just too far down, below the taskbar.
 Jen Lawson on January 10, 2009:
I don't have a zoom box at the bottom of the screen. I wonder if it's a different version. I'm using .46. Do you know if there's another way to do it? Last time I did a tutorial I used illustrator, but I wanted to check out inkscape as well. Which one do you think is easier to use?