
Beading Market
Shop for beadwork made by your fellow beaders at the 3D-Beading.com Beading Market!
Welcome to the Inkscape beading diagram tutorial! If you have any difficulty following this tutorial, please post a comment at the bottom of the page on which you are stuck, and I'll do my best to help!
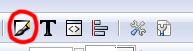
A) Click on the Fill and Stroke button, which is in the top button menu, and looks like a paintbrush tip in a white box. The following screenshot will illustrate what this button looks like.
Do one of the following [B(i) or B(ii)] to fill the ellipse with color:
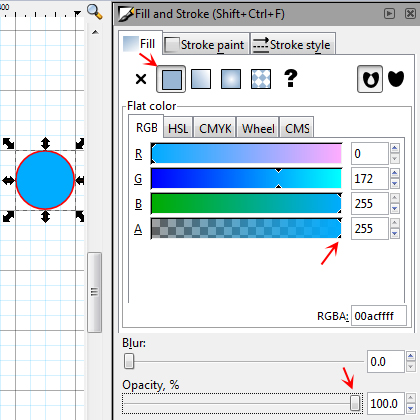
B) i) To fill the ellipse with a solid color of your choice, click on the Fill tab. Make sure that the solid fill button is clicked (click it if it isn't). This is the button immediately to the right of the X button (meaning no fill). I have a red arrow pointing to it in my screenshot in the top left corner. Slide the sliders to pick your color of choice. Make sure the RGB tab is open. This is the one that is meant for the web. The "channels" shown are R (red), G (green), B (blue) and A (alpha, meaning transparency). Slide the RGB sliders to pick your color of choice, and then make sure that the alpha channel is set to 255 (fully opaque, no transparency). If there is any transparency in your fill color, it will be blended with the background color of the website because the diagram's background is transparent. In other words, your color will not look the way you intended. Finally, drag the "opacity" slider at the bottom of the window to 100%, so that your ellipse is fully opaque (this slider controls the object's opacity, not just the fill color opacity).
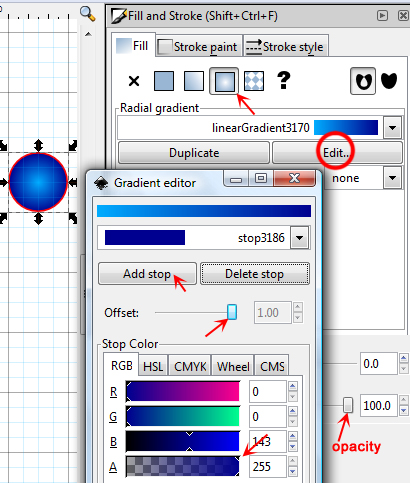
B) ii) To fill the ellipse with a gradient, click on the Fill tab. Click on the radial gradient fill button, which is fourth button to the right of the X button (meaning no fill). In my screenshot, a red arrow is pointing to the radial gradient fill button, at the top of the window. Radial gradient means circular color blending, whereas linear gradient (the button to the left of radial gradient) produces linear color blending. For an ellipse, radial gradients will look more natural. Click the Edit button (circled in red). The Gradient Editor window will pop up. In the gradient editor window, adjust the first color of your gradient by dragging the color sliders: under Stop Color, make sure the RGB tab is open. This is the one that is meant for the web. The "channels" shown are R (red), G (green), B (blue) and A (alpha, meaning transparency). Slide the RGB sliders to pick your color of choice, and then make sure that the alpha channel is set to 255 (fully opaque, no transparency). If there is any transparency in your fill color, it will be blended with the background color of the website because the diagram's background is transparent. In other words, your color will not look the way you intended. Then, click the Add Stop button. Drag the Offset slider all the way to the right for the ending color. Then, choose the color of your ending color the same way you picked your starting color. Again, set the alpha opacity to 255 by dragging the A slider all the way to the right for your ending color. In my screenshot, you can see my starting color is light blue and my ending color (second "stop") is dark blue. Close the Gradient Editor window by clicking the red X in the top right corner. Finally, drag the "opacity" slider at the bottom of the Fill and Stroke window to 100%, so that your ellipse is fully opaque (this slider controls the object's opacity, not just the fill color opacity).
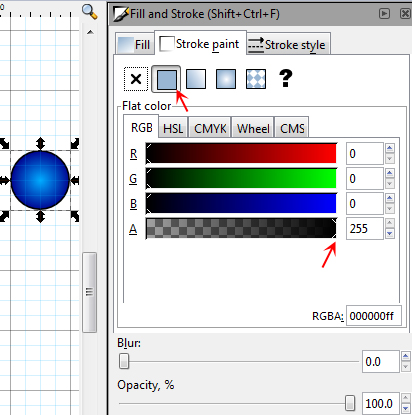
C) To select the stroke color of the ellipse (ie, the bead), click on the Stroke Paint tab. Select the solid stroke fill button, which is pointed to with a red arrow in my screenshot. Select the stroke color by dragging the RGB sliders, as we did with the fill color, then make sure that the alpha channel slider is at 255 (drag the A slider all the way to the right). This will ensure our stroke is fully opaque. I have another red arrow pointing at where the slider should be. I have selected pure black as my stroke color.
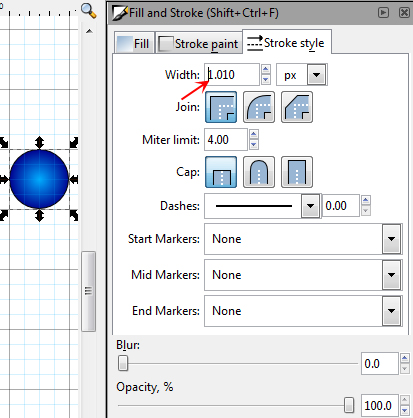
D) You may if you wish adjust the stroke thickness around your ellipse (aka, your bead). I reduced mine because I don't want to bead to look too artificial. Note here though that if you adjust the stroke size, you will need to readjust your ellipse size, because the ellipse will shrink or expand along with the stroke. This will negatively impact snapping, so if you change the stroke width, readjust the ellipse width and height back to 60.000 pixels just like we did a few steps ago when adjusting the ellipse shape and size. This is very important!
