
Beading Market
Shop for beadwork made by your fellow beaders at the 3D-Beading.com Beading Market!
Welcome to the beaded spider pattern instructions! This pattern was generously created and donated to all of us by our fellow beader Jax. If you have any difficulty following this tutorial, please post a comment at the bottom of the page, and I'll do my best to help, or if I am unable, I will inform Jax of the difficulty.

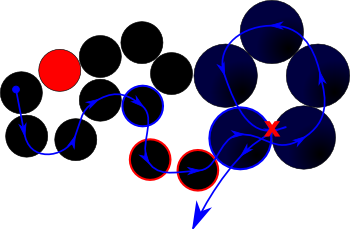
Step 1: We need to add two beads on each side between the head and the body to give us a good spot to add the legs. I only drew part of the body so base how you hold your spider on the location of his eyes. Weave your thread, either one, I used blue on the diagram but you will do this for both sides so use the one that is facing this way.
Thread back until you get to the small black bead circled in blue, this bead is already part of the spider but I wanted to be able to point out which one you exit. Now add two more small black beads, these are circled in red to help make the visual clear and enter back through the big blue bead. Circle all the way around the set of five beads and go ahead and exit your thread out of the big blue bead circled in blue. Make sure your thread is coming out on the side facing the head. You can do this by thread through the five beads and making a half hitch knot at the red x (make sure it is tight so it doesn't pull through) and then exiting between the big bead and the small bead.
Step 7: Repeat for the other leg.
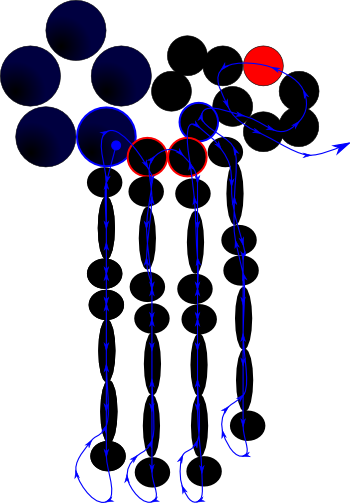
Step 8: We are now going to add the legs. The arrows look a little confusing but this is really easy. With your thread coming out between the big bead and the first little bead we added, add one size 8/0 black bead, on short black bugle bead, two more 8/0 black beads, two more black bugles, one more 8/0 bead, skipping the last 8/0 bead go back up through the two bugles, two 8/0's, one bugle and through the big base bead so your needle is angles to enter the next small base bead. Repeat this for both the small beads we added as connectors and the base head bead, circled in blue still in the diagram. Thread your needle through the circle of five, adding a couple half hitch knots and then exit and trim your thread.
Step 9: Repeat on the other side of your spider to create another set of legs.
You can be done here if you wish but I found the legs to be a little floppy.
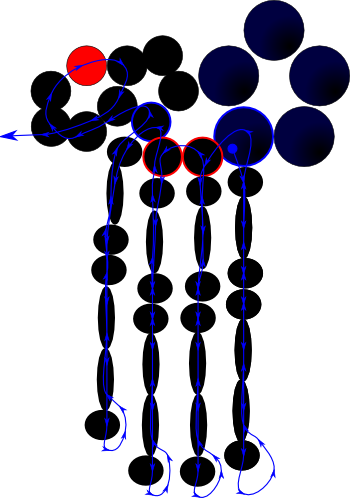
Step 10: Place a piece of wire in through the bottom bugle up to the first size 8/0 bead. Do not trim yet because it will take a little more to make the bends.
Make your first right angle bend between the two size 8/0 beads, being sure to hold the wire at the end. Make your next right angle bend the opposite direction between the bottom two bugle beads. Using wire trimmers or nail clippers, clip the wire at the end of the foot. Repeat for each leg and you are finished!
| Beader Comments: | |||
| There are currently no comments for this page. Add your comment today! |
