
Beading Market
Shop for beadwork made by your fellow beaders at the 3D-Beading.com Beading Market!
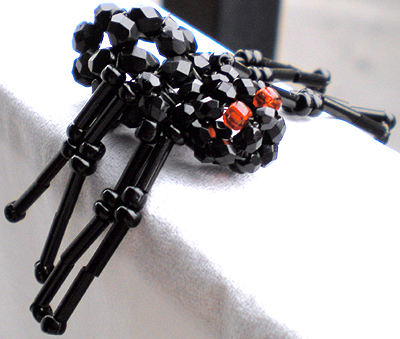
Welcome to the beaded spider pattern instructions! This pattern was generously created and donated to all of us by our fellow beader Jax. If you have any difficulty following this tutorial, please post a comment at the bottom of the page, and I'll do my best to help, or if I am unable, I will inform Jax of the difficulty.
Before you begin ...
Materials:
30 4mm black beads (I used czech fire polished crystals)
32 3mm black beads
2 3mm red beads or size 8/0
32 size 8/0 black seed beads
24 short black bugle beads
3 yards fishing line
12-15 inches 26 gauge wire (or whatever fits inside your bugle beads) *optional
Time required: about 2 hours
Techniques: Beadweaving, right angle weave
Difficulty: Easy/Medium
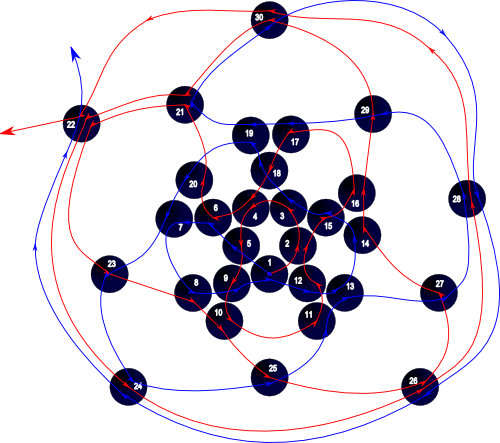
Step 1: Color the ends of your strings, one red and one blue. String on 5 4mm (or larger bead size of your choice) on the red thread and cross both ends of your thread through bead 5. Add beads 6-9 on the blue thread, crossing through bead nine. You should have two circles that look like the number 8. Thread your blue thread back through the first bead in the main circle ad add beads 10-12 to the red thread, crossing both through bead 12. Repeat this process two more times until you have added a total of four more circles to the main circle. To add the fifth circle, take your red thread and pass it through the fourth bead of the main circle and up through the 1st bead you added in the second circle. Add beads 19 and 20 to the blue thread and cross the red through bead twenty. Your piece should now look like a small bowl. Pass your blue thread through the next bead in the 2nd circle you added (bead 7 in the diagram). Add beads 21-23, crossing the threads through bead 23. Pass your red thread through the next two closest beads (8 & 10), add two beads (24 & 25) crossing through bead 25. Repeat this pattern two more times, creating a total of four new circles. When you have added and crossed through bead 29, thread your blue thread back through the next 3 beads, 17, 19 and 21, this creates a U shape. Add bead 30 and cross both threads though this bead. Cinch this tightly.

Step 2: If you look at your circle, you will see you have created another circle of five directly opposite your starting circle. You now want to take your threads and run them in a circle through these 5 beads. You can add a couple half hitch knots as you go around to keep your tension as we move on to the next step.

Step 3: Take your longest thread left and add one 3mm (or smaller size of your choice) black bead pass back down through the big bead and through the next big bead. Add one more small bead and repeat until you have added one small bead on top of each big bead in your last circle of five.

Step 4: Thread both of your threads in opposite directions around the small circle of five, cinching this tight as you go. This will create the main circle for the head like you did in the first step for the body.
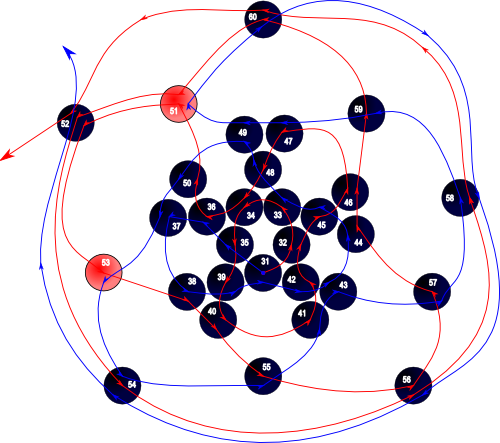
Step 5: Repeat the head exactly as you did the body, except replacing two of the black beads with red beads as indicated in the diagram. When you add the last circle, circle back through the five beads creating the last circle.
You now have your spider head and body.
| Beader Comments: | |||
| There are currently no comments for this page. Add your comment today! |
