
Beading Market
Shop for beadwork made by your fellow beaders at the 3D-Beading.com Beading Market!
Welcome to the Gimp beadwork photo editing tutorial! If you have any difficulty following this tutorial, please post a comment at the bottom of the page on which you are stuck, and I'll do my best to help!
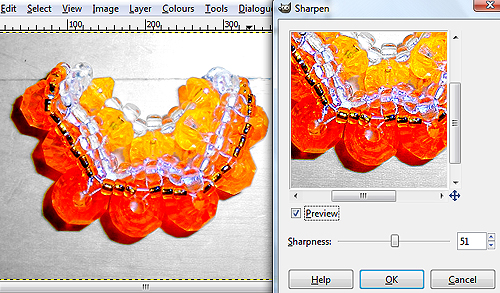
11) The colours may be done, but the picture is not quite yet presentable. Due to all the colour editing, the sharp lines of the original image are somewhat blurred. So it's time to sharpen the image. Go to Filter >> Enhance >> Sharpen. The Sharpen window will open. Ensure that "preview" is selected so you can see the effects of your actions. This window is very easy to use. Simply drag the Sharpness slider until your image is sufficiently naturally sharp looking. I chose a sharpness of 51 (I have no idea what the unit is). Click OK when you're done.
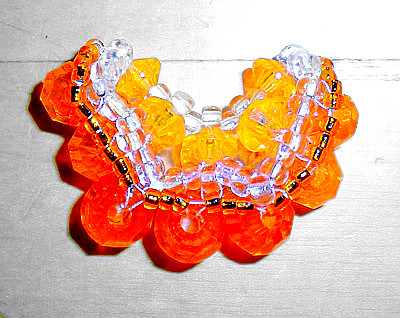
12) Save as! We're now done enhancing the original image. So save it, either under the same name (File >> Save) or under a new name (File >> Save As...) Enjoy! Shown here is the final sharpened and enhanced image. Does it look any better than the original? I should hope after all that work! The next procedure will teach you how to crop and resize an image using Gimp.
Part II - Cropping and Re-sizing
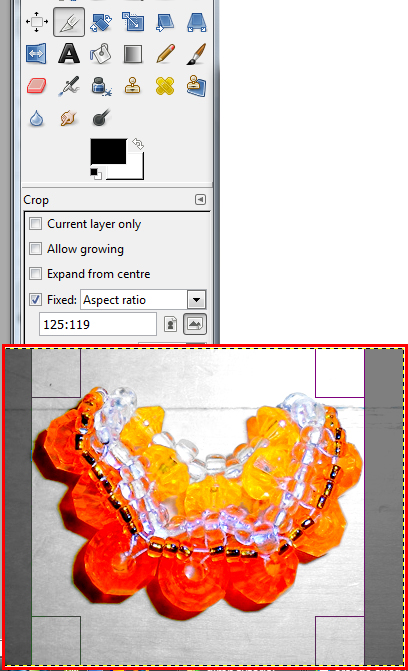
1) Choose the Crop tool from the toolbox in the left vertical window, top side. The icon looks like the tip of an exacto knife, and is selected (boxed) in the picture. My red box picture is not supposed to be superimposed on top of the left vertical window, but I did so to conserve space. Turn your attention to the Crop tool options, underneath the toolbox. My red box is hiding some of the options, but those aren't important. The only important option is the one I checked off, if you are planning to make a thumbnail image from your picture, and your thumbnail has to be a specific size. Otherwise, if you don't care about the exact dimensions of your final image, don't check off any options here. If you are making a fixed size thumbnail, do the following:
- Check Fixed, and choose Aspect Ratio from the drop-down menu.
- Choose the final dimensions of your image, in Width:Height format. I chose 125 width by 119 height because that is the dimensions of all my thumbnail images on the site. Note that this only tells the computer what ratio you want your thumbnail to be. You won't actually resize the image in this step, but you'll crop it to the proper ratio of dimensions, so that when you resize to the proper dimensions (next step), you won't skew the image.
- Now drag across the image with the crop tool to make your selection. The borders will be snapping to the ratio you specified. You can then release the crop and move the box around over the image until you find a good angle that you like, that cuts off unnecessary blank space without cutting off too much of the picture itself.
- If you're not satisfied with your first try, nothing is lost, so just try again by dragging again, and your new box will replace your old one.
- Click Enter on your keyboard to perform the crop. This will cut off the excess and make your image the proper length to width ratio. Again, this change is permanent unless you undo it.
- If you simply want to cut off the excess blank space in the image without specifying a size or ratio, don't check off any options, just drag across the image to crop it free hand. Your movements will be unrestricted.
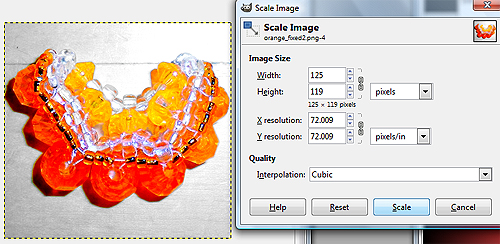
2) If desired (for instance if you are making a thumbnail of your image, or you are making a large image off a camera smaller to email it), you can shrink your original image. This can go hand in hand with the cropping step, if you cropped the image to your desired dimensions, but you can also resize the image to its current dimensions if you are happy with them. You can even change the dimensions, but this will skew the image. By default, the ratio of length to width is locked, so the image will not skew and the ratio will be held constant as you resize, such that if you enter a new width, the height will auto-adjust. Choose Image >> Scale Image. The Scale Image window will open. First you will be asked for the desired Image Size. You can select your unit of choice (eg, pixels, inches, cm, percent of original). The figure 8/paper clip-looking symbol between the Width and Height lines is the lock symbol telling you that the ratio is fixed. You can click that icon to unlock it, so that you'll be able to change the width and height independently of each other, but his will skew the image. As you can see, I adjusted the width down to 125 pixels and the height auto-adjusted to 119, since I had adjusted the ratio to this by cropping in the previous step. You can change the image resolution if you want, but I wouldn't bother. It won't have any effect on how your picture looks on the internet. Click Scale to accept the changes. Your image will shrink to the desired dimensions. You could also enlarge the image, of course, but it would appear blocky.

Finished: And here's our finished thumbnail! Go to File >> Save As... to save it. Okay and that's a wrap. I hope you enjoyed the Gimp photo editing tutorial, and let me know your feedback by dropping a comment below.
