
Beading Market
Shop for beadwork made by your fellow beaders at the 3D-Beading.com Beading Market!
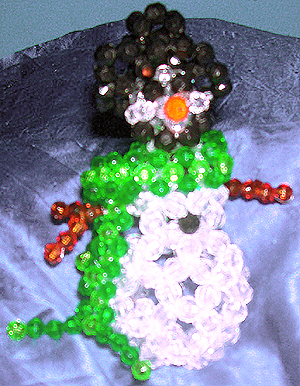
Welcome to the beaded snowman pattern instructions! This pattern was generously created and donated to all of us by our fellow beader Celeste. If you have any difficulty following this tutorial, please post a comment at the bottom of the page, and I'll do my best to help, or if I am unable, I will inform Celeste of the difficulty.
Before you begin ...
Materials: ~2 meters of fishing line (such as fireline), round plastic beads in white or transparent, black, dark green, light green, brown, and orange. The white beads should be in two sizes, such as 8mm (for the lower and middle balls) and 6mm (for the head). You need two orange beads, one 8mm, and one 6mm, for the nose. The black beads for the buttons should be 8mm, and the head beads (hat, mouth and eyes) should be 6mm. Use 6mm brown beads for the arms. Use 6mm green beads for the scarf.
Time required: about 2 hours
Techniques: Beadweaving, right angle weave
Difficulty: Medium
Step 1: In this pattern we're starting with the head first. We're using 6mm white beads. I used 8mm Black beads for the mouth and nose on mine, but you can use either.
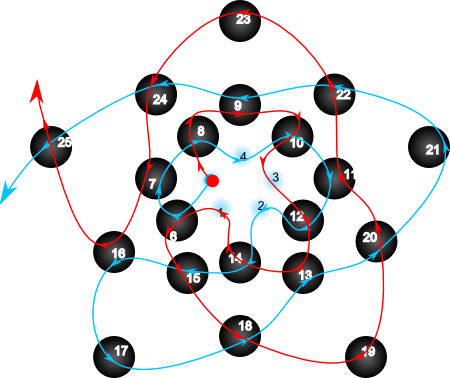
1. Add five beads, cross at five. Beads one and two are the mouth.
2. Add five more beads, cross at your 9th added bead, which will be a black bead.
3. Go through an existing bead, 1. Add 3 new white beads.
4. Go though existing bead 2. Add 2 white beads, and one black one. You will cross at the black one.
Continue this pattern, you are always making a circle of 5 beads. when you finish the head, set it aside.
*NOTE* You HAVE to use 6mm beads, or any bead smaller then the body bead your using. Otherwise your head and middle will be the same size!
Step 2: Now we're going to work on the middle section! Soon he'll be looking like a snowman in no time. This is done with 8mm beads. You repeat everything you just did with the head, the only thing different is the position of the black beads. These will be the two buttons on his chest.
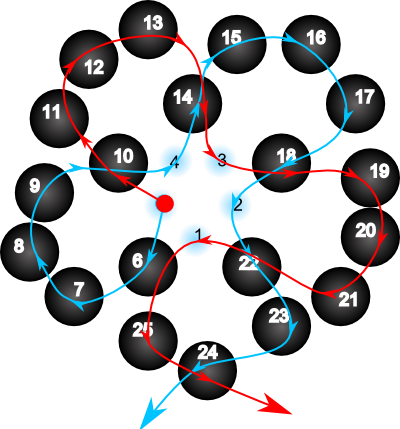
1. We'll start with bead one, which is a black bead. Then add 4 white beads, crossing at the 5th bead.
2. Add 4 white beads, cross at the 9th bead
3. Go through existing bead one (which is black), and then add 3 more white beads, crossing at your 12th bead.
4. Go through existing bead 2 (White bead), and add 3 more beads crossing at your 15th bead.
You'll continue making circles of 5 beads until the end.
Step 3: Now we're starting on the bottom of the snowman. We're using all white 8mm beads. We're going to borrow the five beads from the snowmans middle. NOT the circle with the original 5 beginning beads, but the other side where we ended the middle piece. which one you start at wont matter, because the bottom is all the same.
1.Start by stringing through the 5 beads from the middle froom support, cross through the 5th bead.
2. Add 5 white beads, cross at your 10th bead
3. Go through existing bead 4, add 4 new beads and cross at the 14th bead.
4. Go through existing bead 3, add 4 new beads and cross at the 18th bead.
5. Go through existing bead 2, add 4 new beads and cross at the 22nd bead.
6. Go through existing bead 1 and 6, add 3 new beads. Your crossing at the 25th bead.
Your done with your first row! Just continue along. Please note, in this pattern it begins to alternate with a circle of 6 and a circle of 5. Just be careful! *NOTE* you may want to make the middle body section of the snowman as the top and the bottom, because they matter when attaching the head and the bottom!
We're done with the entire body, yay! Well, now we're going to attach the head to the middle section. The head attaches to the top of the middle. Since the head obviously wont just fit on top, we will add a small neck to the snowman with a few beads. When you first put the head on, the mouth bead will touch the button bead. This will space it out, and also give room for our scarf!
For mine, I used 6mm beads. I attached two to the front, on either side of the 'button', then strung them through the mouth and tied at the middle of the mouth.
For the other two, i attached them to the back of the snowmans head and made a circle of five, using the two beads to complete the circle of five.
You can try making the neck how you like though, and experiment with it yourself.
Step 4: Almost done! Now we'll work on the accesories, first, we'll do he hat. We attach the hat directly onto the snowmans head, it is not done seperately. You will use the top 5 beads on his head, right above his eyes. First, let's do the top of the hat. You can start at any point on the top 5 circle of beads.
1. Start from your chosen first bead. (I chose bead 5) Add three black beads, crossing at your 3rd black bead (Bead 8 in the pattern)
2. Go through existing bead 4, add 2 black beads and cross at your 10th bead.
3. Go through existing bead 3, add two black bead crossing at number 12.
4. Go through existign bead 2, add 2 more black beads crossing at bead 14.
5. Go through existing beads 1 and 6, add only one new black bead and cross it there.
You will continue this until you get to the top of the add, doing one more row on tol of the other one just like we did the first row. The top of he hat will make a circle of five, tie off and go through it a few times.
Step 5: Now we'll do the brim of the hat! Again, we're going to use the same five beads that we used for the top of the hat. start whereever you like again, I started from 5.
1. Start from your chosen bead. Add 5 black beads, and cross at the 5th bead you add. (Bead 10 in the pattern)
2.Go through existing bead 4, add 4 beads crossing at the last bead you added, bead 14.
3.Go through existign bead 3, add 4 new beads and cross at the last bead you added, bead 18.
4.Go through existing bead 2, add 4 new beads and cross at the last bead you added, bead 22.
5.Cross through existing bead2 1 and 6, add 3 new beads and tie tight. Your hat is now complete!
| Beader Comments: | |||
| There are currently no comments for this page. Add your comment today! |
