
Beading Market
Shop for beadwork made by your fellow beaders at the 3D-Beading.com Beading Market!
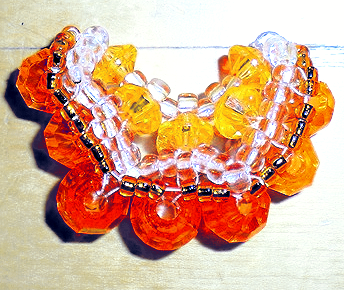
Welcome to the beaded orange slice pattern instructions! This pattern was generously created and donated to all of us by our fellow beader Jax. If you have any difficulty following this tutorial, please post a comment at the bottom of the page and one of us will leave you an answer.
Before you begin ...
Materials:
8 ~ 4 mm round crystals, bicones or rondelles Orange (A)
4 ~ 6 mm crystals Orange (B)
3 ~ 8mm crystals Orange (C)
55 ~ 8/0 seed beads Clear (D)
52 ~ 11/0 seed beads Orange (E)
Time required: 30 minutes
Techniques: Beadweaving, right angle weave
Difficulty: Easy
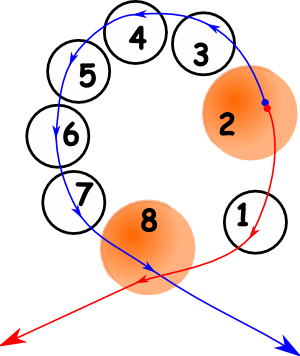
Step 1: Mark one end of your thread blue and one end red.
String on 1 D, 1 A, 5 D and 1 A on your blue thread. Pass your red thread through your last A bead (# 8 in the picture) creating a circle of beads.

Step 2: In this step you will be creating the "segments" in your orange slice. Add 5 D and 1 A to your red thread.
Add 1 D to your blue thread and pass through your 1 A on your blue thread (bead 15)
Repeat this 2 more time so you have a total of 4 circles. To come up the next side, pass your red thread through your last single D added in the fourth circle (bead 28), add 5 D and 1 A to your blue thread and cross your red thread through this last A bead.
Add 5 D and 1 A to your red thread. Pass your blue thread through bead 21 and then through your last A strung on your red thread. (Bead 41)
Repeat this one more time to create another segment in your orange.
You should have a total of 7 "segments," 4 on one side and 3 coming back up your other side. The piece should feel funny shaped because you are creating a wedge shape.
For your last circle, pass your blue thread through the very first D and A you added (beads 1 and 2). Add 5 D on your red thread and then pass through bead 2 to complete the circle.
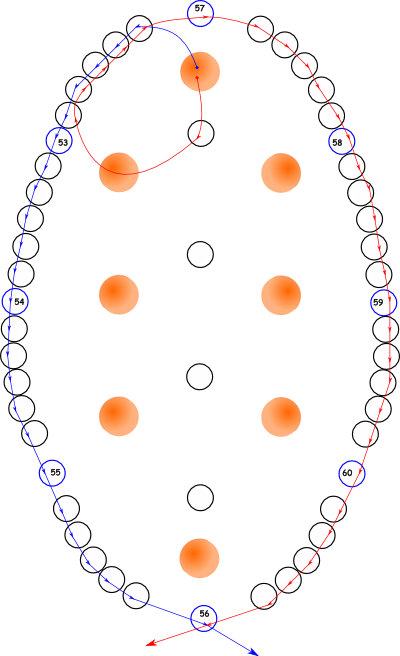
Step 3: In this step we need to add a few 8/0 beads to the outer ring to complete our segments.
First we will position our threads starting with blue. Our thread is coming out of the top A bead, follow your circle t6o the left passing through the first 5 D beads we added in step 1. Add 1 D bead then pass through the next 5 D beads in your second segment. The beads we are adding are outlined in blue in the diagram.
Continue around the outer edge of D beads, adding a total of 4 new D beads.
Four our red thread, we need to circle around to the outer edge of D beads. Your thread is angled down toward the middle so pass through our very first D bead added, then through our second A bead and through the 1st 5 D beads the opposite way you just did with the blue thread. Add 1 D to the top of the circle. Pass through the next 5 D beads.
You will continue down this side just like you did on the other side with your blue thread, also adding a total of 4 new D beads. When you get to the bottom, pass through the very last bead you added to your blue thread, completing the circle.
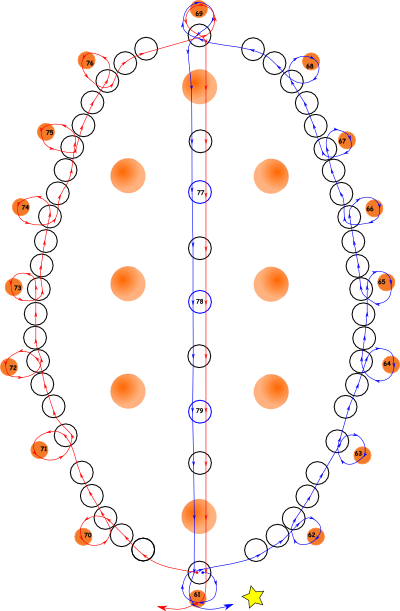
Step 4: In this step we will add our 11/0 seed beads to create our base for the peel of our orange slice (ignore the star for just a second). We will start with our blue thread this time.
Add 1 E bead to your blue thread and pass back through your last D bead added in step three. Your blue thread should now be angled to go up the right side of your orange, Pass through 3 D, add 1 E, circle back through the D bead your thread was coming out of. You will repeat this all the way up the side, adding a total of 9 E's.
At the top, you will bring your thread back down the center of your orange and we need to add 3 D beads to make this part smooth. Pass through the top A bead, the next D bead heading down the middle, add one D, pass through the next D. Add 2 more D beads on your way down. Pass through the bottom A bead, the D bead we started this step with and out through the first E bead we added.
Your red thread is already angled in the right direction so we will pass through 3 D beads, add 1 E bead as we did with the blue thread on the other side. Continue in this manner up to the top. You will be adding a total of 7 E beads.
When you reach the top E bead, circle through this bead and thread your line down through the middle like you did with the blue thread, only this time you will not be adding any more D's, just passing through the ones we just added.
Thread your red thread out through the first E bead we added. So your red thread should be coming out to your left and the blue out to your right. The star is to help us with orientation to the next picture. We want the flip the work 180 degrees so the threads are at the top and the blue is now coming out to your left and the red to your right.

Step 5: We will complete the peel in this step. First make sure your piece is oriented right. We will add 3 E beads to both threads. Pass through the first E bead on each side that we added in the last step.
Add one B and cross both threads through this bead. Add two E beads to each thread, pass through the existing E bead on each side. Add 1 B and again cross both threads through this bead.
Add two more E beads to each thread, pass through existing E beads on each side, this time we will add 1 C bead and cross both threads through this bead.
Continue in the manner adding the last 2 C beads then the last 2 B beads.
After adding the last B bead, we will add 4 E beads to each thread, pass through the bottome E bead. For added strength, pass your threads, one on each side, back up through the E beads. This will also help keep your E beads from sliding in the holes of the larger beads.
Your beaded Orange slice is now finished! You can easily change this from an orange slice to a lemon or lime slice by changing the the colors of your beads!
| Beader Comments: | |||
| There are currently no comments for this page. Add your comment today! |
