
Beading Market
Shop for beadwork made by your fellow beaders at the 3D-Beading.com Beading Market!
Welcome to the beaded cubes pattern instructions! This pattern was generously created and donated to all of us by our fellow beader Celeste. If you have any difficulty following this tutorial, please post a comment at the bottom of the page, and I'll do my best to help, or if I am unable, I will inform Celeste of the difficulty.
Before you begin ...
Materials: 48 crystals (4 to 6 mm) or seed beads (size 6); 1 meter of fishing line; optional: 36 smaller seed beads (size 11 or 15) to be strung between the larger beads once the cube is completely beaded
Time required: 30 minutes
Techniques: Beadweaving, right angle weave
Difficulty: Easy

Step 1:
In this pattern, we'll be starting at the orange dot (not the yellow star!) at bead #1. First, string 4 beads onto your piece of fishing line and cross the strings at the 4th bead. Add 3 more beads, and cross at the 7th bead. Add 3 more beads, cross at the 10th bead. At this point, you are going to string through a bead you already have placed in your pattern, which is bead #3! Just add two more beads now, and cross at bead #12. The majority of the pattern is repeating itself, just remember that you are always making a circle of 4 beads! Keep beading by following the pattern until you have crossed the strings on bead 44, where the yellow star is drawn.
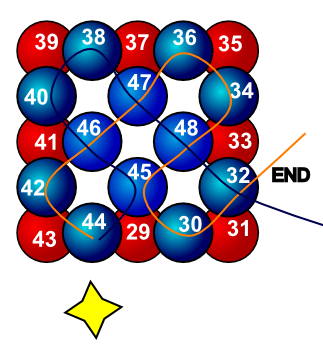
Step 2:Once you are done with the bottom and the 4 sides of your beaded cube, we will pause after crossing the strings at bead 44. Pull your strings tight. You should have a hollow cube with no top on it! We'll add that now. In the pattern, look at the four-sided yellow star, this is where you left off, your pattern is just pulled tight now, do you see it? I shaded beads 30, 32, 34, 36, 38, 40, 42, and 44 (the all-around blue beads in this diagram) darker than the middle ones (45, 46, 47, 48) so that you could tell the old beads from the new ones added in this step. The middle beads are the new ones to be added (the top of your cube!)
From bead 44, you will string through bead 42 (Which is already in the pattern!) And then you will add 2 new beads (Beads 45 and 46). Cross through bead 46. String through beads 40 and 38, which are already in the pattern. Add one new bead, 47, and cross there. String through beads 36 and 34, add 1 new bead, and cross. Your cube is almost done now! String through beads 45, 30, and 32. Cross at 32. From there, take your string through some beads, tie a knot between the two ends of your fishing line or string, string through some more beads, then cut your strings short. You're done!
Tips:
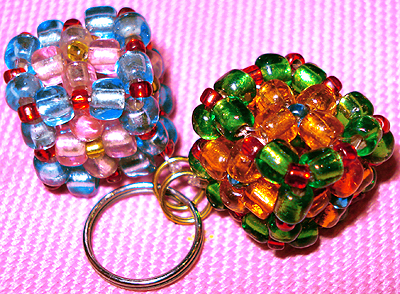
- Colours: You don't have to use two different colors, but if you're making your first cube, then it's much easier to use two or more colours because you won't lose your place in your pattern. Follow this exact colour scheme on your first cube, then play around with it on your next tries to get your perfect motif (something more complex like the cubes in the picture)
- Seed beads: If you want your cube to look extra intricate, you can string size 11 or 15 seed beads between each two larger beads, as you can see from the picture; this is very easy, just go back through all the beads in your cube and insert smaller seed beads between the bigger beads
- Bugle beads: If you use long thin bugle beads instead of crystals or large seed beads, your cube will be like a skeletal lattice!
If you have any questions, feel free to ask! Post a comment on this page.
| Beader Comments: | |||
| There are currently no comments for this page. Add your comment today! |
