
Beading Market
Shop for beadwork made by your fellow beaders at the 3D-Beading.com Beading Market!
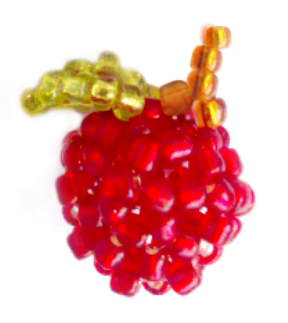
Welcome to the beaded apple pattern instructions! This pattern was generously created and donated to all of us by our fellow beader Laura. If you have any difficulty following this tutorial, please post a comment at the bottom of the page, and I'll do my best to help, or if I am unable, I will inform Laura of the difficulty.
Before you begin ...
Materials:
- 100cm of nylon thread/fishing line,
- 64 red seed beads (R)
- 18 green seed beads (G)
- 5 brown seed beads (B)
(I used size 8/0 seed beads but you can use any size you want).
Time required: 1-2 hours
Techniques: Beadweaving, right angle weave
Difficulty: Easy/Medium
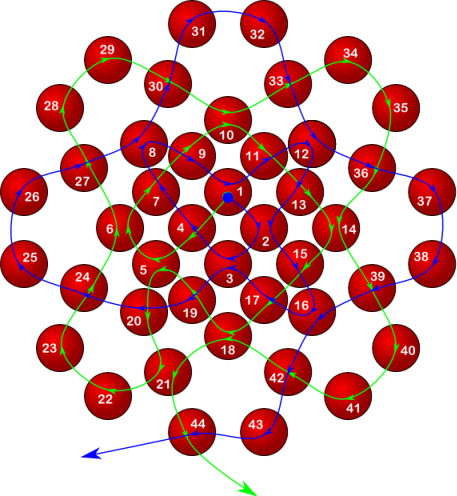
Step 1: We will be starting at the blue dot on Bead 1. This bead should be at the centre of your nylon thread - one end of the thread is your blue thread and the other end is your green thread. I will refer to the red beads as follows: first bead R1, second bead R2, third bead R3, etc. And the same for the green beads: G1, G2, etc and brown beads B1, B2, etc. (Green/brown beads are found in later steps/diagrams). Remember to pull tight regularly.
- Thread R1-R4 and criss-cross through R4
- Thread R5-R7 and criss-cross through R7
- Thread R8-R9 and criss-cross through R9, then pass the blue thread (the one you used to thread R8-R9) back through R1
- Thread R10-R11 and criss-cross through R11
- Thread R12-R13 and criss-cross through R13, then pass the blue thread (the one you used to thread R12-R13) back through R2
- Repeat this pattern until you criss-cross through R19, pass the green thread back through R5, add R20 and criss-cross again.
- Thread R21-R24 and criss-cross through R24
- Thread R25-R27 and criss-cross through R27
- Thread R28-R30 and criss-cross through R30
- Repeat this pattern until you criss-cross through R42, pass the green thread back through R18 and R21, add R43-R44 to the blue thread and criss-cross through R44
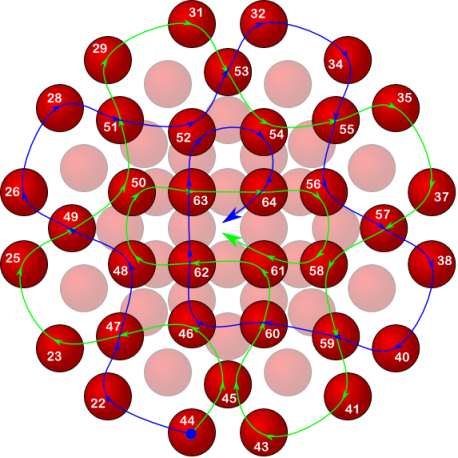
Step 2: Beads R22-R44 from the previous step are used in this step (other beads from the previous step are shown but faded out). Also note that we are now working inwards towards the middle - where the apple comes together at the top. Both threads should be coming out of R44 - the blue dot on the diagram. Remember to pull tight regularly.
- Pass the blue thread through R22
- Thread R45-R47 and criss-cross through R47, then pass the green thread (the one you used to thread R45-R47) back through R23 and R25
- Thread R48-R49 and criss-cross through R49, then pass the blue thread (the one you used to thread R48-R49) back through R26 and R28
- Thread R50-R51 and criss-cross through R51, then pass the green thread (the one you used to thread R50-R51) back through R29 and R31
- Repeat this pattern until you criss-cross through R59, pass the green thread back through R41, R43, and R45, add R60 and criss-cross again.
- Pass the blue thread through R46
- Thread R61-R62 and criss-cross through R62, then pass the green thread (the one you used to thread R61-R62) back through R48 and R50
- Thread R63 and criss-cross through it, then pass the blue thread (the one you used to thread R63) back through R52 and R54
- Thread R64 and criss-cross through it, then pass the green thread (the one you used to thread R64) back through R56, R58 and R61
- Pull the threads extra tight and then tie your threads together in a double-knot
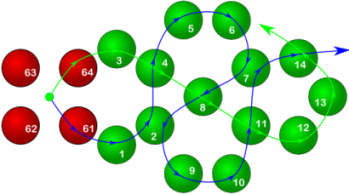
Step 3: The apple itself is now finished - we just need to add the leaf (green beads) and stem (brown beads). You should now be looking down at the top of your apple where your threads come out. You should be able to see 4 red beads in a circle (R61-R64). These beads are used in the next few steps as well as our green beads (G1, G2, G3, etc). We are going to start at the green dot which is where your threads should already be. Remember to pull tight regularly.
- Pass the blue thread through R61 and the green thread through R64
- Thread G1-G2 using the blue thread and thread G3-G4 using the green thread, then criss-cross through G4
- Thread G5-G8 and criss-cross through G8, then pass the blue thread (the one you used to thread G5-G8) back through G2
- Thread G9-G11 and criss-cross through G11, then pass the blue thread (the one you used to thread G9-G11) back through G7
- Thread G12-G14 and criss-cross through G14
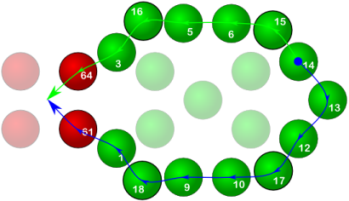
Step 4: We are now going to fill in the edges of the leaf starting at G14 where the blue dot is in the diagram. Remember to pull tight regularly.
- Thread G15 using the green thread, then pass it through G6 and G5
- Thread G16 using the green thread, then pass it through G3 and R64
- Pass the blue thread through G13 and G12
- Thread G17 using the blue thread, then pass it through G10 and G9
- Thread G18 using the blue thread, then pass it through G1 and R61
- Pull the threads extra tight (the leaf should curl and take shape) and tie your threads together in a double-knot

Step 5: We will now create the stem using the brown beads (B1, B2, etc) and red beads R62-R63 (from step 2). We will start at the green dot on the diagram which again, is where your threads should already be. Remember to pull tight regularly.
- Holding both threads together, thread B1-B4, then pass both threads back through B3 and B2
- Holding both threads together, thread B5, then pass the blue thread back through R48 and R62 and pass the green thread back through R50 and R63 (don't worry that you can't see the green thread properly between R50 and R63 on the diagram - it threads through exactly the same as the blue thread but on the other side)
- Pull the threads extra tight and then tie your threads together in a double-knot
Your beaded apple is now finished!
| Beader Comments: | |||
| There are currently no comments for this page. Add your comment today! |
