
Beading Market
Shop for beadwork made by your fellow beaders at the 3D-Beading.com Beading Market!
Welcome to the Adobe Illustrator beading diagram tutorial! Note: Adobe Illustrator is not a free program. If you do not already have Adobe Illustrator version 9 or above installed on your computer, I recommend that you follow the Inkscape tutorial instead. Inkscape is actually easier to use than Adobe Illustrator, and it's a free program without adware. If you have any difficulty following this tutorial, please post a comment at the bottom of the page on which you are stuck, and I'll do my best to help!
Things to know ...
Adobe Illustrator Version 9 is used in this tutorial. If you have an earlier version, you may be okay, but I can't guarantee it. Newer versions should definitely be fine.
Adobe Illustrator is not a free software. If you don't already have Adobe Illustrator installed on your computer, I recommend following the Inkscape tutorial instead. Download Inkscape for free from inkscape.org.
This tutorial assumes that you already have some working knowledge of how to use Adobe Illustrator (because I assume you already have it installed and have used it before). It's a very detailed tutorial, but you'll probably find the Inkscape tutorial much more detailed, because it assumes you have never used Inkscape before.
Drawing a Beading Diagram in Adobe Illustrator:
1) Open a blank document (I chose 500 by 500 pixels).
2) In the bottom left corner, reduce the magnification from 126% to 100%.
3) Select the ellipse tool from the toolbar on the left. Do one of the following:
- Either: Open the info palette by clicking on the "info" tab in the very top right corner of the screen. This will display the length and width of your circle as you make it. Click anywhere on the blank document while holding down the Shift key, and drag the mouse. The Shift key locks the shape to a perfect circle. Drag until the circle is around 60 pt. Doesn't have to be exact, but remember the number. Another way of finding out the length and width of the circle is to double click on the circle itself after it has been drawn, and you will see a pop-up box telling you the length and width.
- Or: Simply click anywhere on the blank document once (remember the ellipse tool is selected). A box will pop up asking you for the length and width of your ellipse. Enter 60 pt for both length and width.
(For your information: You can always change the size of the circle after drawing it in one of two ways. Either select the selection tool from the toolbox on the left (which is the very top left icon, the black arrow) and then a box will show up around your ellipse. Click on one of the corner dots and hold shift while dragging the mouse to make the circle bigger or smaller. Shift again constrains the shape to a circle rather than an oval. The other way is to double click the circle and enter new length and width values.)
4) Our circle is now white with a black border. It's fine for now. We will colour all of our circles together later. So for now we want to see a grid so that we can position the circles. Go to the View menu at the top of your screen and select "Show Grid". The grid will appear over your artwork. We want the boxes of our grid to match the exact size of our circle, so we will change the grid size. Go to the Edit menu, select Preferences, and then select "Guides and Grid..." Beside "Gridline every:", type "60 pt" (or whatever the dimensions of your ellipse are, which I told you how to figure out earlier). Beside "Subdivisions:", type "4". Click OK.
5) The grid should now match your circle size exactly, such that your circle would fit perfectly in a grid square. Now we want illustrator to do this for us automatically without us having to inch it in perfectly. So, go back to the View menu and select "Snap to Grid". To test the snapping, select the selection tool (black arrow) or the direct selection tool (white arrow) from the toolbox, and try dragging your circle. It should only drag by increments of your grid.
6) Now we want to duplicate the circle. This is very easy. Select either the selection tool (black arrow) or the direct selection tool (white arrow) from the toolbox. While holding down the Alt key, click the circle and drag it a certain short distance. Release the mouse and you will have duplicated the circle.
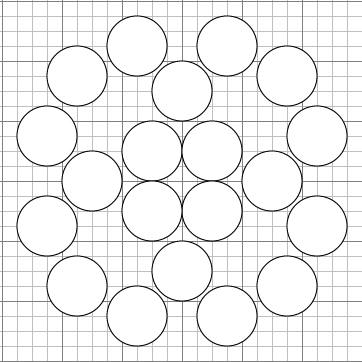
7) Now is the time to draw the pattern. Now because the grid is horizontal and vertical, rather than diagonal, we will draw the pattern on its side (at a 45 degree angle from the final drawing). Here is a screenshot of what it should look like after you have drawn the circles on the grid.
8) We can now get rid of the grid. So, go to the View menu, and click "Hide grid". Also in the View menu, deselect "Snap to Grid" (make sure it isn't checked anymore.)
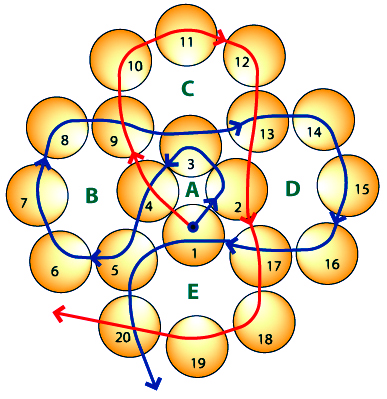
9) Now we want to rotate the circles by 45 degrees so that they are upright (or we could just leave them like this, but I rotated them to match Laura's diagram). To rotate all the circles as a group, select the selection tool (black arrow) from the toolbox, and drag it over the entire group of circles. They should all be selected with a big box all around them. Hold down shift to constrain your angle of rotation to 45 degree increments, and hold your cursor right outside the corner of the big box. You should see a curvy double arrow. Now, while holding down shift, drag the box until it's upright.
10) Now we want to colour our circles. They should all still be selected, but if not, drag over them with the selection tool to highlight them all as a group. Select the Gradient tool from the toolbox (it's just above the scissors icon). Now, go to the Gradient palette, which is located on the right side of the screen. You should see the word Gradient on a tab, beside Transparency and Stroke. Click that tab, and then beside "Type:", select "Radial". Then, you should see a black and white gradient show up on each and every circle. Now click on the very center of your group of circles, where the letter A is in the final diagram. This will make the center of the diagram the light source for all the circles.
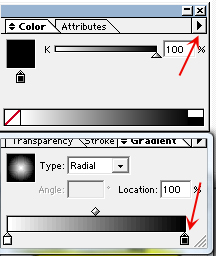
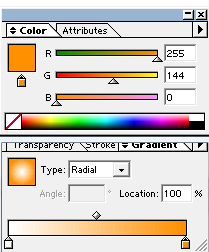
11) To make the circles orange instead of black, click on the "Gradient slider" for the black. That is, click on the little arrow under the gradient bar, which is on the far right, under the black. I am posting a picture of the gradient slider, with a red arrow pointing to it. Once you have clicked on the gradient slider, the color box will show itself. The color palette box is also showing in my picture. Click on the sideways black arrow at the top right corner of the color palette. I have drawn a red arrow pointing to it as well. In it, you will see a checkmark beside "Grayscale". Select the option right under "Grayscale", which is "RBG", standing for "Red Blue Green", the primary colours. A whole bunch of colour sliders will show up. Just slide them until the circles are the colour that you like. I am posting the picture of what the sliders look like when you have selected orange as your circle colour (and just by sliding them, the circles change colour in your document.)
12) Now we need to add the text (the numbers). This is the boring but easy part. Simply select the typing tool from the toolbox (looks like a T). Click on the circle where you want the text to go. Type the text (ie, the number). Then hold Ctrl and click (anywhere) to "finish" off the text (to remove the cursor so you can place text on the next circle). Then just click on the next circle, type the next number, Ctrl+click anywhere nearby, and click on the next circle, etc. You can type the green letters in the center of the beading circles the same way. For the colour, just double click on the black square in the toolbox (representing the foreground colour) and select another colour, then click OK. Any text you draw after that will be of that colour. To increase the font size, go to the Type menu at the top of your screen, and go to Size, and choose a bigger size. To bolden text, select Character, and a box should show up allowing you to choose a bunch of typing options. To edit a bunch of text at the same time (ie, all your numbers or all your letters as a group), select the selection tool (black arrow) or the direct selection tool (white arrow), and click on a letter or number. Then, holding down the shift key, click on all the rest of the letters or numbers you want to edit as a group. Then, you can change the size, boldness, and font, etc. of all that text together.
13) Now we need to lock the objects that we have drawn so far to prevent them from interfering with the arrows we are about to draw on the diagram. To lock to objects so that they can't be selected by the selection tool, select all the objects on the diagram right now (all the circles and numbers) using the selection tool. Then go to the Object menu at the top of the screen, and select "Lock". This will make playing with your arrows a LOT easier.
14) For the arrows, this part is the coolest. So to draw the arrow outlines is very easy. Click on the pen tool in the toolbox. Make sure that at the bottom of the toolbar, the little white box with the red diagonal line through it is selected. (I'm posting a picture with this box showing, it's the third little icon in a row). This means that illustrator will not edit your "pen path" with colours until you have finished drawing it. This should be the default.
15) Start drawing with the pen tool. Now this is different from drawing with a paintbrush tool, where you would normally draw lines by dragging the mouse across the page. With the pen tool, you just have to click down dots like connect the dots when you were a kid. The program will automatically connect the dots you draw as you draw them. So click on bead 1, then on bead 2, etc. Don't drag the mouse or it will think you want to make angles! Continue clicking and drawing until one of the "arrows" of our diagram has been drawn.
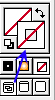
16) To colour the arrow, we will "stroke" it. I'm posting a picture of what the stroke icon looks like in the toolbox (by the way, the little box underneath it is the one I was talking about earlier). The stroke icon is pointed to with the blue arrow in my picture. Double click that icon, and select a colour to stroke the pen path with. I selected blue for my first pen path (ie, arrow in my diagram). Click OK and the pen path will be stroked with the blue colour.
17) Repeat for the second arrow in the beading diagram. Select the pen tool, click bead 1, and keep clicking on beads along the path of the fishing line. Stroke the pen path with red this time.
18) Now for the final touches. We want arrow heads and we want to rounden the edges of our arrows. By the way, if any of the arrows are on top of your numbers, we will fix this later. So to make arrow heads, we can go to the Effect menu, select Stylize, then select "Add Arrowheads...". However, this will only add arrowheads to the very end of your pen paths because the path is all connected. So we will now take the scissors tool and disconnect the path at spots of our choice. Select the scissors tool from the toolbox. Simply click along each of your two pen paths where you want the arrow heads to appear. You don't have to pre-select them. The scissors will know which path to cut automatically. That's it! Now just select the selection tool and drag over the whole image to select both pen paths (ie, both arrows). Go to the Effect menu, select Stylize, then select "Add arrowheads", and click the preview button to see what your arrowheads will look like. You can choose your arrowhead of choice and size of choice from the pop-up box based on what you see in the preview. Click okay and all of your arrowheads will fall exactly where you wanted them.
19) Almost done! We want the diagram to look nice and smooth, so all your arrows should still be selected. All you have to do now is go back to the Effect menu, select Stylize, and select "Round Corners..." In the pop-up box, beside "Radius:", type "20 pt" (instead of the default 10 pt). Click OK. That's it!
20) Now to fix any numbers that may have been covered by the arrows. Go to the Object menu, select "Unlock All", and then select the selection tool from the toolbox. Move any numbers that are under arrows.
That's it! Good luck with drawing your beading diagrams! If you want to submit a beading diagram to this website as a pattern, email your file to me at allegra@3d-beading.com
